Developer Guide
This document describes the architecture and software implementation of the application, Ha(ppy)Bit. The document will be great for you if you are a developer who wish to gain insight into the design considerations and implementation of features, and possibly expand on the application.
- Acknowledgements
- 1. Introduction
- 2. Setting Up
- 3. Design
- 4. Implementation
- Appendix A: Product Scope
- Appendix B: User Stories
- Appendix C: Non-Functional Requirements
- Appendix D: Glossary
- Appendix E: Instructions for Manual Testing
Acknowledgements
This application reused some parts of the code from:
- Developer’s name: Daren Tan (find his profile here)
- Code source: CS2113T Individual Project
- Link to code: https://github.com/DJ-Tan/ip.git
This application referenced some parts of the code from:
- Developer team: find the team here
- Code source: AB-3
- Link to code: https://github.com/se-edu/addressbook-level3.git
This application adapted the Developer Guide and User Guide from:
- Developer team: find the team here
- Link to Developer Guide: https://se-education.org/addressbook-level3/DeveloperGuide.html
- Link to User Guide: https://se-education.org/addressbook-level3/UserGuide.html#quick-start
1. Introduction
1.1. Overview of Ha(ppy)Bit
Ha(ppy)Bit is a desktop application aimed to empower students to achieve their goals—whether personal, academical, or health—amidst the hectic and stressful university life, through cultivating good habits. The application operates on a Command Line Interface (CLI) while still comprising features typically found in a Graphical User Interface (GUI). Students who type fast will find that Ha(ppy)Bit performs habit tracking more efficiently than your conventional GUI applications.
1.2. Terminology
| Name | Description | Example |
|---|---|---|
| Goal | A long term achievement you wish to accomplish. | Lose 5kg by Dec |
| Habit | Small, actionable tasks to be done to achieve goal. | Run 5km |
| Interval | The time period (in days) which you want the habit to recur. | Run 5km every 7 days |
A goal can have one or more habits.
A habit can have one or more intervals.
1.3. Icons and Format
📃 Note: important information you should take note off (especially if you encounter input errors)
⚠️ Warning: avoid doing the things mentioned here at all costs (unless you’re feeling lucky)
💡 Pro-Tip! additional information that may make your tracking journey easier
2. Setting Up
The following section covers basic setup instructions to get you up and running on the HappyBit development environment.
2.1. Application Requirements
- Ensure that you have installed Java SE Development Kit (JDK)
11on your computer. If you do not have it installed, you may download it from here. - We recommend using IntelliJ IDEA.
- Fork our repository, and clone the fork to your computer.
2.2. Project Set-Up
⚠️ Warning: Follow the steps in the following guide exactly. Any deviations may result in the code failing to run as intended.
- Start IntelliJ IDEA.
- If you are currently on a project, close the project.
- Navigate to
Pluginsand ensure that the Gradle plugin is enabled (Gradle is installed by default). - Open the project that was forked to your computer.
- Set-up JDK
- Navigate to
File>Project Structure...>Project - Under
Project SDK, add the JDK installed in Section 2.1.1 - Under
Project Language Level, choose11 - Local variable syntax for lambda parameters
- Navigate to
- Navigate to
Project>tp>src>main>happybit>HappyBit - Locate the
mainmethod and click the green triangle on the left of it - If the code builds and runs with no issues, you are good.
3. Design
3.1. Overall Architecture
The architecture diagram below describes the high-level design of the application.
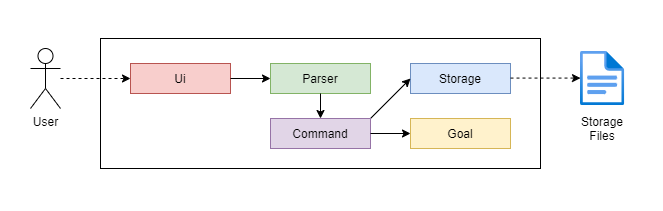
The 5 main components of the architecture diagram are:
Ui: User interface of the applicationParser: Parses user inputs (checks if input is valid and logic is correct)Command: Executes the user commandsGoal: Contains the data of all goals, habits and intervals, as well as the logic to update themStorage: Facilitates transfer of data between the application and external storage files
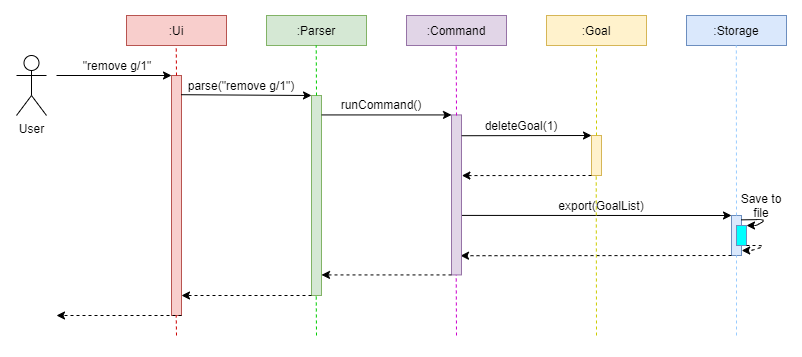
The sequence diagram below shows how the components interact with each other for the scenario where you issue the
command remove g/1 to remove the goal at index 1.
We will now explain the 5 individual components, beginning with the UI Component.
3.2. UI Component
Firstly, the UI component is responsible for all user interfaces of the application. However, the component is further divided
into 2 sub-components: UiManager.java for static interface displays, and PrintManager.java for dynamic interface
displays (display messages in response to user input). The diagrams below illustrates the high level representation of
each sub-component.
3.2.1 UiManager
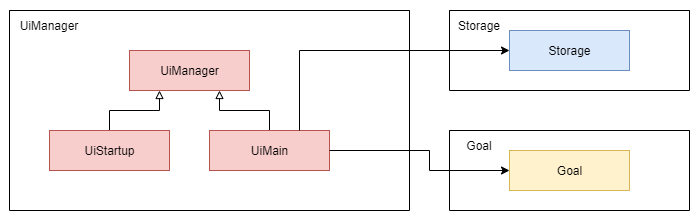
API: UiManager.java
UiStartupwill be called upon starting the application (we refer to this as the start state).UiMainwill be called upon entering the main state of the application (the main state is entered when you select the option[5] Start Applicationin the start state).UiMaincallsGoalto display a static view of all your habits to be done for the day.UiMaincallsStorageto display alerts for status of storage imports and exports.
3.2.2 PrintManager
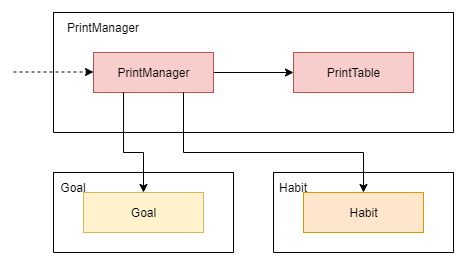
API: PrintManager.java
PrintManageris called upon by user commands to display text or error messages.PrintManagermay callPrintTableto print a list of items in a tabular format, for example when you input thehelpcommand to view a summary of formats of relevant commands in a tabular form.PrintManagerdepends onGoalandHabitto print goal-related and habit-related information respectively.
3.3. Parser Component
Our second component is the Parser component, responsible for parsing and checking the logic of the user input. The diagram below illustrates the high level representation of the component.
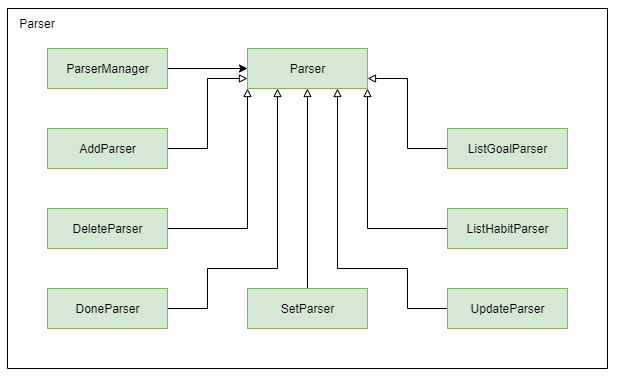
API: Parser.java
- A user input is given to
ParserManagerthat determines which subclass ofParseris required - Inputs starting with
help,return, andexitare handled byParserManager - Other inputs are handled by
Parser, which has a total of 7 subclasses:AddParserhandles the parsing of inputs starting withsetandaddDeleteParserhandles the parsing of inputs starting withremoveanddeleteDoneParserhandles the parsing of inputs starting withdoneListGoalParserhandles the parsing of inputs starting withlistListHabitParserhandles the parsing of inputs starting withviewUpdateParserhandles the parsing of inputs starting withupdateandchangeSetParserHandles the parsing of inputs starting withgoal
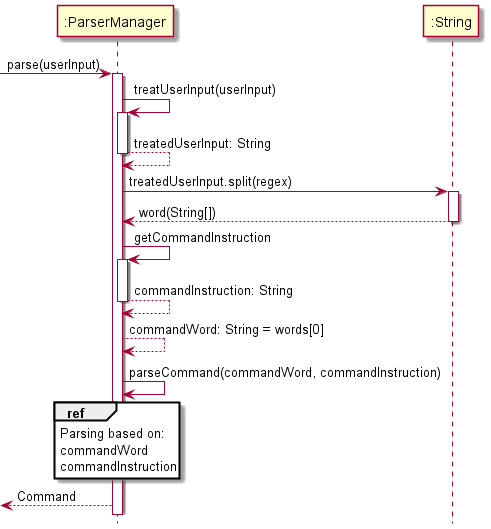
The sequence diagram below illustrates the flow of logic when a generic user input is entered into the application.
3.4. Command Component
The Command component is responsible for executing the application logic based on the parsed user input. The diagram below illustrates the high level representation of the component.
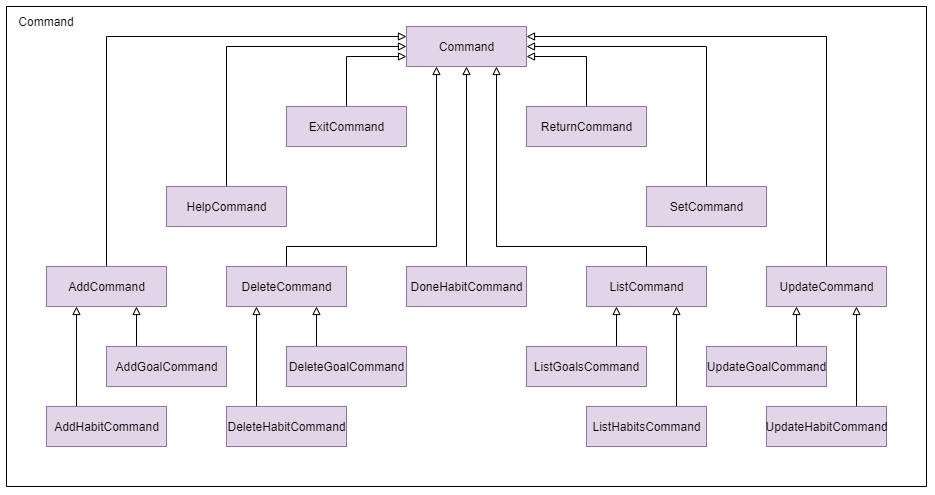
API: Command.java
Commandobtains the breakdown of required parameters from Parser - this means that no logic is performed here.- Add, update, done and delete commands updates the GoalList.
- Commands that update the GoalList, as well as
ExitCommandandReturnCommand, updates the Storage. - The following describes the features of each command:
AddGoalCommand- Adds a new Goal to the GoalList.AddHabitCommand- Adds a new Habit to a specified Goal set by the user.UpdateGoalCommand- Updates one or more attributes (Name, End Date, Type) for a Goal.UpdateHabitCommand- Updates one or more attributes (Name, Interval) for a Habit.DoneHabitCommand- Marks a Habit from a specified Goal as completed.ListGoalCommand- Lists out all the Goals set by the user.ListHabitCommand- Lists out all the Habits set under a Goal.DeleteGoalCommand- Deletes a Goal from the GoalList.DeleteHabitCommand- Deletes a Habit from a specified Goal set by the user.SetCommand- Indexes into a Goal so that commands can be called without stating a Goal’s index (not implemented).HelpCommand- Prints out table of all available commands.ReturnCommand- Returns the user to start state of the application (Refer to Section 3.2. for start state).ExitCommand- Saves all changes and exits the application.
3.5. Goal Component
The Goal component is responsible for maintaining and updating all goals set by the user. This includes running logic to ensure that there are no violations when modifying information related to a goal. The diagram below illustrates the high level representation of the component.
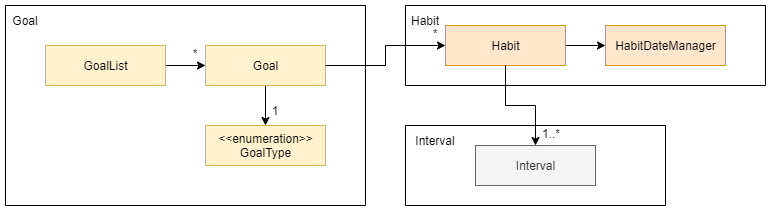
API: Goal.java
- 0 or more
Goalare associated with aGoalList. - A
Goalmust have exactly 1GoalType. If not specified, theGoalTypewill be DEFAULT. - 0 or more
Habitare associated with aGoal. Habitmay callHabitDateManagerto handle date related logic.- 1 or more
Intervalare associated with aHabit.
3.6. Storage Component
The Storage component allows data to be read from and saved to a storage file. The diagram below illustrates the high level representation of the component and the interactions between the other components.
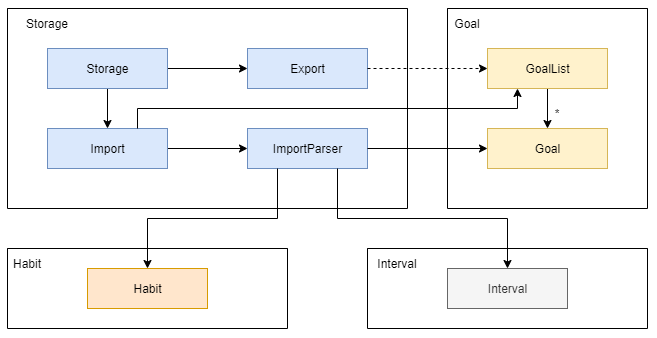
API: Storage.java
StoragecallsExportwhen saving data from theGoalListto an external storage file.StoragecallsImportwhen reading data from the external storage file to theGoalList.ImportcallsImportParserto decode the data extracted from the external storage file.ImportParsercallsGoal,Habit, andIntervalin that order to load data into theGoalList.
4. Implementation
This section describes some noteworthy details on how the main features are implemented.
4.1. Adding a Goal
This section describes the implementation of how the user can add a goal to their tracking list.
4.1.1. Implementation
Adding a goal is amongst the first feature that the user will interact with as they begin goal tracking. The add goal
feature is implemented using the AddParser and AddGoalCommand class. It allows the user to create a new goal on
their personal account which will be stored in the GoalList class.
- The
AddParser#parseAddGoalCommand(commandInstruction)method is called, which in turns calls theAddParser#getGoal(commandInstruction)method. - The
AddParser#getGoal(commandInstruction)method will internally check for name, goal type, start date, and end date parameters. The name parameter has been limited to a maximum of 50 characters. The start date has to come after the end date, in addition to both dates needing to come after the date when the goal was created. - An
AddGoalCommand(goal)object is created from theAddParser#parseAddGoalCommand(commandInstruction)method.

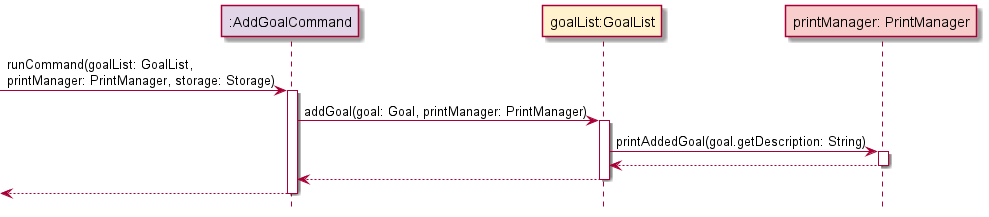
- The
AddGoalCommand#runCommand(goalList, printManager, storage)method is called, which in turns calls theGoalList#addGoal(goal, printManager)method. - The
GoalList#addGoal(goal, printManager)method checks for duplicated goal names before adding a goal to the list. - The
PrintManager#printAddedGoal(description)method prints an acknowledgement message that the goal has been added.
4.1.2. Design Considerations
Aspect: Limiting number of characters for goal name
- Alternative 1: No limit imposed, but cut-off after a fixed number of characters and replace with ellipsis when
printing the list.
- Pros: Table will be of a fixed size and reduced chance of error if the character limit is exceeded.
- Cons: Important information regarding the name may be unintentionally cut-off.
- Alternative 2 (current choice): A 50-character limit is imposed.
- Pros: Entire name will be visible when printing the list, also no chance of exceeding character limit.
- Cons: Table may be misaligned if the user’s monitor is too small, name has to conform within the limit.
4.2. Adding a Habit
This section describes the implementation of how the user can add a habit to one of their tracked goals.
4.2.1. Implementation
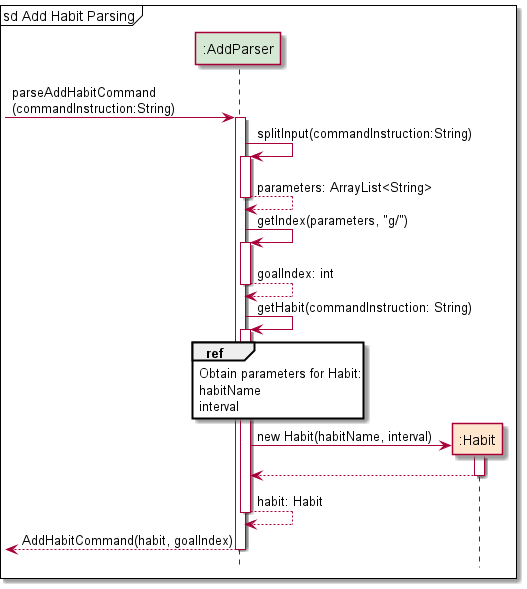
- The
AddParser#parseAddHabitCommand()method is called, which starts the process of extracting parameters from the user input. - The
AddParser#splitInput(commandInstruction)method splits the user input into a string array of parameters, while theAddParser#getIndex(paramters, "g/")method finds the goal index from this string array and checks that the index is a positive integer. - The
AddParser#getHabit(commandInstruction)method creates aHabitobject from the parameters of the user input. Within this method, there is a 50-character limit imposed on the name, as well as an integer check for the interval. - An
AddHabitCommand(habit, goalIndex)object is created from theAddParser#parseAddHabitCommand()method.
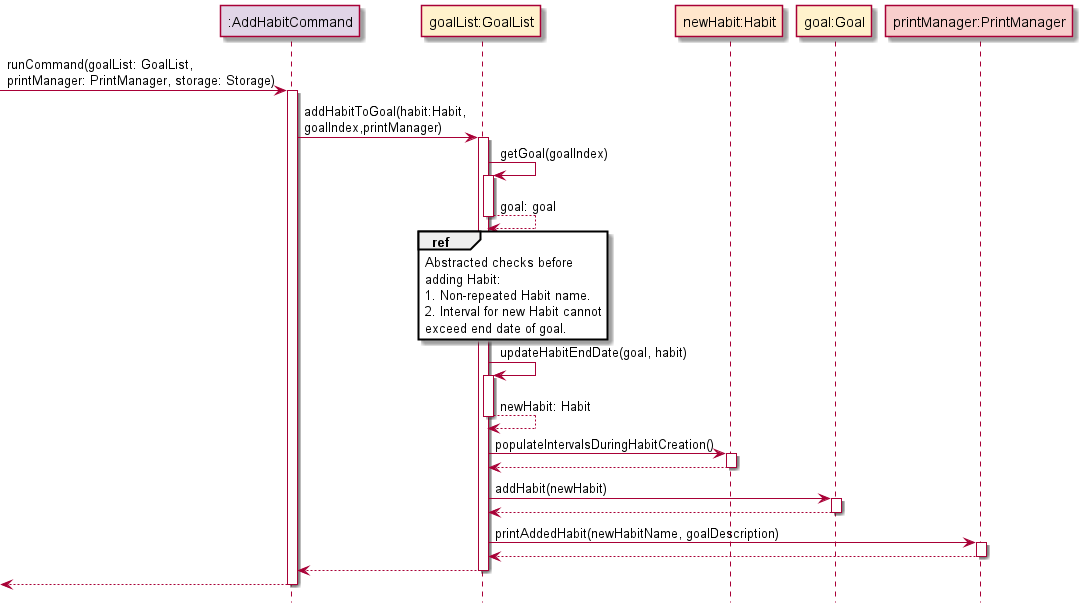
- The
AddHabitCommand#runCommand(goalList, printManager, storage)method is called, which in turns calls theGoalList#addHabitToGoal(habit, goalIndex, printManager)method. - Within this newly called method, the
GoalList#getGoal(goalIndex)method is called to ensure that the habit to be added is associated with a goal. Following which, methods ofGoalListwill verify that the habit to be added does not already exist within that goal, as well as having an interval that is smaller or equal to the number of days between the start and end dates of the goal. - The
GoalList#updateHabitEndDate(goal, habit)method is called to set the end date of habit similar to that of the associated goal. This was not performed during habit creation since the check for goal existence was not performed withinAddParser. This method returns a newHabitobject with its end date filled in. - The
Habit#populateIntervalsDuringHabitCreation()method is finally called to generate intervals for the newHabitobject, given that the start date, end date, and interval are known at this point. - The
Habitobject is added to the list of habits associated with the goal (of step 6) through theGoal#addHabit(newHabit)method. - The
PrintManager#printAddedHabit(newHabitName, goalDescription)method prints an acknowledgement message that the habit has been successfully added to the goal.
4.2.2. Design Considerations
Aspect: Calling constructor of Habit object with end date
- Alternative 1: Create
Habitobject inAddParserwith end date.- Pros:
Habitconstructor can generate all intervals upon habit creation, lesser logic required inGoalList. - Cons: A
GoalListobject has to present inAddParserto check for a goal’s existence (non-trivial).
- Pros:
- Alternative 2 (current choice): Create
Habitobject inAddParserwithout end date and updating inGoalList.- Pros: No additional logic required to get the
GoalListobject inAddParser. - Cons: Additional logic required in
GoalListto update end date and populate intervals.
- Pros: No additional logic required to get the
4.3. Listing all Goals
This section describes the implementation of how the user can display a list of all tracked goals.
4.3.1. Implementation
- The
ListGoalsParser#parseListGoalsCommand(input)method is called. Since the list goals command does not require any parameters, any extraneous text after the ‘list’ keyword is treated as the string variableinput. - The
ListGoalsParser#parseListGoalsCommand(input)method then returns aListGoalsCommand(input).

- The
ListGoalsCommand#runCommand(goalList, printManager, storage, gibberish)method is called, which in turns calls theGoalList#listGoals(printManager, gibberish)method. The string variablegibberishis logically equivalent to the variableinput. - The
ListGoalsCommand#runCommand(goalList, printManager, storage)method is called, which in turns calls theGoalList#listGoals(printManager)method. - If the
GoalListobject is empty, theGoalList#listGoals(printManager)method returns an exception indicating that there are no goals to be printed. - Otherwise, the method calls the
PrintManager#printGoalList(goalList, goalList.size(), gibberish)method, which iterates through allGoalobjects and prints their respective description line by line in a table. gibberishis limited to 40 characters, with any characters after the limit trimmed.

4.3.2. Design Considerations
Aspect: Information to be included for the list of goals
- Alternative 1: Include minimal information, but add a command that prints in depth statistics of the goal.
- Pros: The command to list goals acts as a quick view for the user without the clutter of irrelevant information.
- Cons: Total number of commands required will be increased, resulting in increased application complexity.
- Alternative 2 (current choice): Include all information, inclusive of statistics.
- Pros: The command acts as an overview of everything the user may need to know about each goal.
- Cons: Too much upfront information, which may lead to a lot of user scrolling if the list is very long.
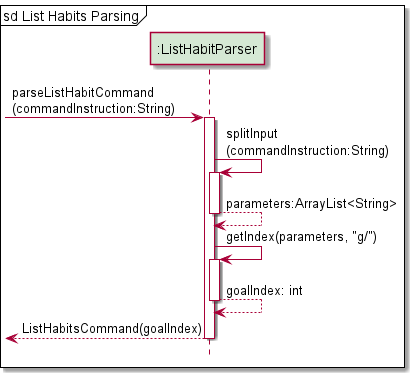
4.4. Listing all Habits
This section describes the implementation of how the user can display a list of all habits under a tracked goal.
4.4.1. Implementation
- The
ListHabitParser#parseListHabitCommand(commandInstruction)method is called, which starts the process of extracting parameters from the user input. - The
ListHabitParser#splitInput(commandInstruction)method splits the user input into an ArrayList of parameters, while theListHabitParser#getIndex(parameters, "g/")method finds the goal index from the parameters ArrayList and checks that the index is a positive integer, returning the goalIndex of the specified goal in the goalList. - An
ListHabitsCommand(goalIndex)object is created and returned from theListHabitParser#parseListHabitCommand(commandInstruction)method.
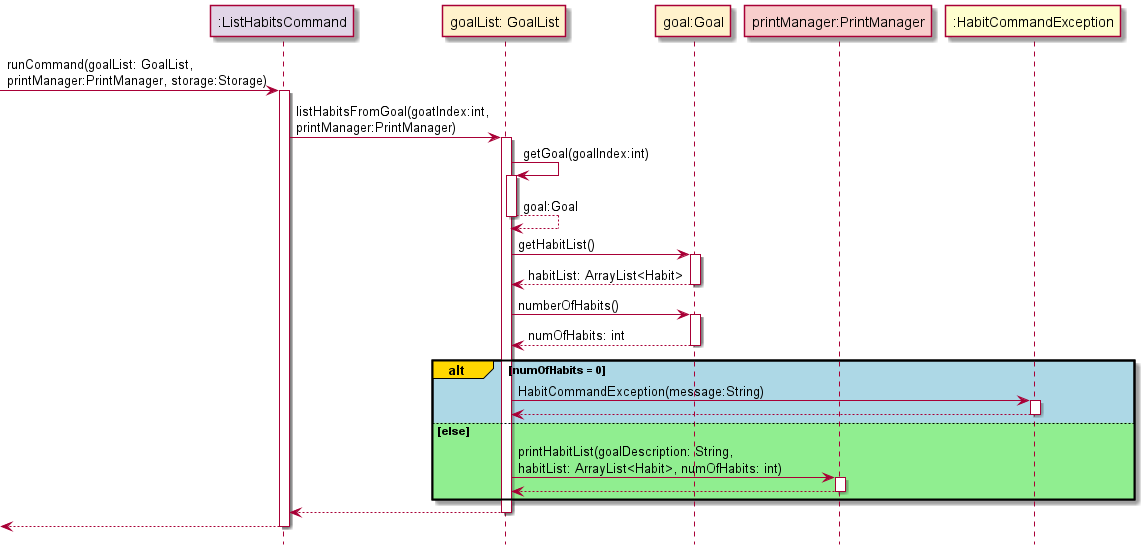
- The
ListHabitsCommand#runCommand(goalList, printManager, storage)method is called, which in turns calls theGoalList#listHabitsFromGoal(goalIndex, printManager)method. - Within this newly called method, the
GoalList#getGoal(goalIndex)method is called to retrieve theGoalobject from theGoalListobject. - The
Goal#getHabitList()method is called to retrieve all the habits associated with thatGoalobject. - The
Goal#getListLength()method is called to find the number of habits associated with thatGoalobject. - If the habitList is empty, a
HaBitCommandExceptionis raised to indicate the error that there are no habits associated with that goal. - Otherwise, the
PrintManager#printHabitList(goalName, habitList, numOfHabits)method prints all habits associated with that goal in a tabular form.
4.4.2. Design Considerations
Aspect: The class to get the list of habits from
- Alternative 1: Obtain list of habits directly from
Habitclass.- Pros: Eliminate the need to pass the list of habits between classes before reaching
PrintManager. - Cons:
GoalList,GoalandHabithas to be associated withPrintManager, which makes add-ons difficult for future developers that have to deal with the high level of class dependency.
- Pros: Eliminate the need to pass the list of habits between classes before reaching
- Alternative 2 (current choice): Obtain list of habits indirectly from
GoalListclass- Pros: Only the
GoalListclass will be associated with thePrintManagerclass. - Cons: The list of habits have to passed from the
Habitclass, through theGoalclass, before being available in theGoalListclass.
- Pros: Only the
4.5. Completing a Habit
This section describes the implementation of how the user can mark a habit as completed for the current interval.
4.5.1. Implementation
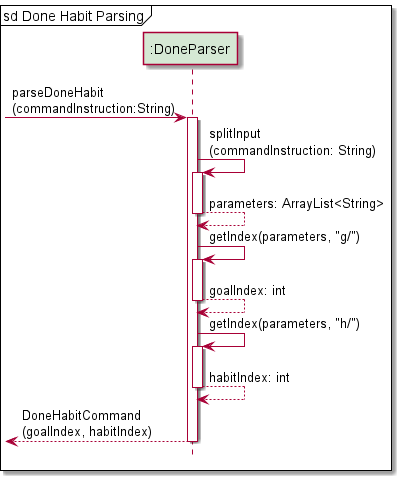
- The
DoneParser#parseDoneHabitCommand(commandInstruction)method is called, which starts the process of extracting parameters from the user input. - The
DoneParser#splitInput(commandInstruction)method splits the user input into an ArrayList of parameters, while theListHabitParser#getIndex(parameters, "g/")andListHabitParser#getIndex(parameters, "h/")methods find the goal index and habit index from the parameters ArrayList respectively. These methods check that the index is a positive integer and returns the index, throwing aHaBitParserExceptionotherwise. - An
DoneHabitCommand(goalIndex, habitIndex)object is created and returned from theDoneParser#parseDoneHabitCommand(commandInstruction)method.
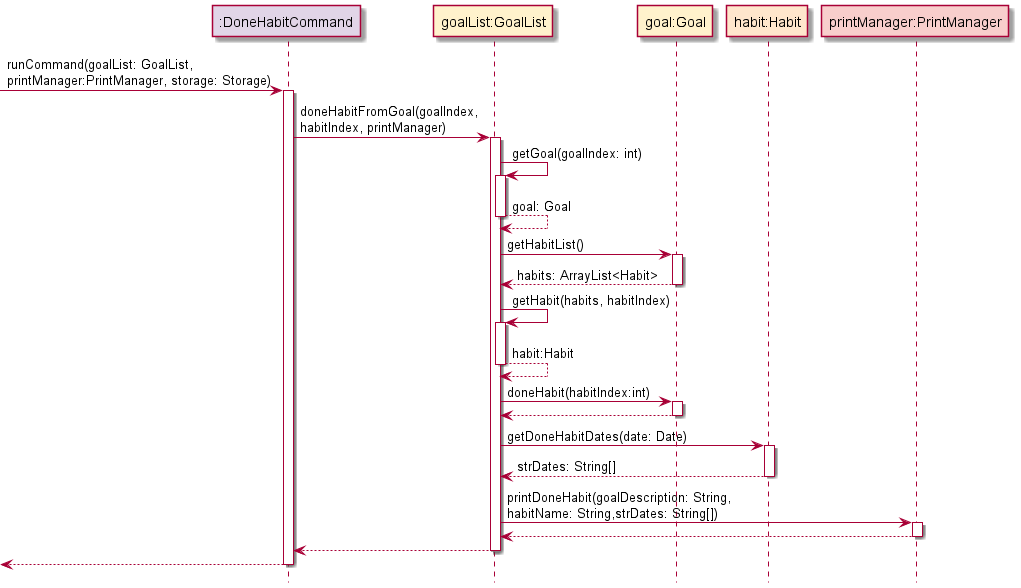
- The
DoneHabitCommand#runCommand(goalList, printManager, storage)method is called, which in turns calls theGoalList#doneHabitFromGoal(goalIndex, habitIndex, printManager)method. - Within this newly called method, the
GoalList#getGoal(goalIndex)method is called to retrieve theGoalobject from theGoalListobject. - The
Goal#getHabitList()method is called to retrieve all the habits associated with thatGoalobject. - The
GoalList#getHabit(habitList, habitIndex)method is called to retrieve the habit at the specifiedhabitIndex. - The
Goal#doneHabit(habitIndex)method is called to mark the specified habit as completed. - The
Habit#getDoneHabitDatesmethod is called to get information on the start and end dates of the interval marked as done, as well as the next interval’s start date. This is information is required for printing a confirmation message to the user. - Finally, the
PrintManager#printDoneHabit(goalDescription, habitDescription, strDates)method is called to print a confirmation message on the successful completion of a habit.
4.5.2. Design Considerations
Aspect: Backtracking for marking habits as completed
- Alternative 1 (current choice): Users are only allowed to mark the current intervals of habit as completed.
- Pros: Users will not abuse the tracking application by marking past intervals as completed.
- Cons: Users temporarily unable to access the application will be penalised for not updating their completion on application although the habit has been completed within that interval.
- Alternative 2: Users are allowed a fixed number of habit retro-completions.
- Pros: Users will not be penalised if they did not have access to the application for whatever reason.
- Cons: Additional logic has to be implemented to ensure that a reduction in number of intervals is also reflected with a proportional reduction in retro-completions. Furthermore, the number of retro-completion has to be backed by past statistics which we do not have at the moment.
4.6. Updating a Goal
This section describes the implementation of how the user can update a goal’s name, type and/or end date.
4.6.1. Implementation
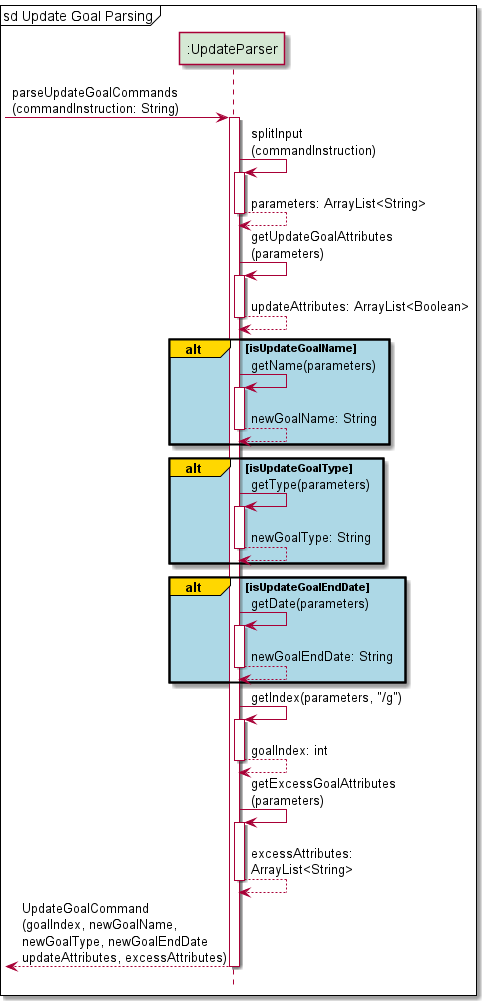
- The
UpdateParser#parseUpdateGoalCommands(commandInstruction)method is called, which starts the process of extracting parameters from the user input. - The
UpdateParser#splitInput(commandInstruction)method splits the user input into an ArrayList of parameters. - The
UpdateParser#getUpdateGoalAttributes(parameters)method is used to confirm what attributes exist in the user input and finds the flags for those attributes (goal name, goal type, and goal end date). - If
isUpdateGoalNameis true,UpdateParser#getName(parameters)is called to get the updated name. - Similarly, if
isUpdateGoalTypeandisUpdateGoalEndDateis true, they will callUpdateParser#getType(parameters)andUpdateParser#getDate(parameters)to get the updated type and updated end date respectively. - The
goalIndexto update is then obtained with theUpdateParser#getIndex(parameters, FLAG_GOAL_INDEX)method - Any excess attributes provided in the input is found with the
UpdateParser#getExcessGoalAttributes(parameters)method. This is required as a parameter for theUpdateGoalCommandconstructor. Its use is detailed in the steps below. - Finally, an
UpdateGoalCommand(goalIndex, newGoalName, newGoalType, newGoalEndDate, updateAttributes,
excessAttributes)
object is created and returned from theUpdateParser#parseUpdateGoalCommands(commandInstruction)method.
- The
UpdateGoalCommand#runCommand(goalList, printManager, storage)method is called, which in turns calls theGoalList#updateGoalAttributes(goalIndex, newGoalName, newGoalType, newGoalEndDate, updateAttributes, excessAttributes, printManager)method. - Within this newly called method, the
PrintManager#printLine()method is called to print a line to separate the new messages being printed. - Based on the
updateAttributesparameter, if the first element is true,GoalList#updateGoalName(goalIndex, newGoalName, printManager)is called to update the goal name, calling thePrintManager#printUpdatedGoalName( oldGoalDescription, newGoalDescription)method to print a confirmation message on successful update of goal name.
Similarly, if the second element is true,GoalList#updateGoalType(goalIndex, newGoalType, printManager)is called to update the goal type, calling thePrintManager#printUpdatedGoalType(oldGoalTypeName, newGoalTypeName)method to print a confirmation message on successful update of goal type.
Finally, if the third element is true,GoalList#updateGoalEndDate(goalIndex, newGoalEndDate, printManager)is called to update the goal end date, calling thePrintManager#printUpdatedGoalEndDate((goalName, oldDateString, newDateString)method to print a confirmation message on successful update of end date after performing some date checking to ensure the end date is valid. - Lastly, the
PrintManager#printUpdateGoalMessageEnd(excessAttributes)method is called to print a message if some excess parameters can be modified with a different command. - Finally, since this command modifies the
goalListdata, the modified data is saved to the program data file withStorage#export(goalList). If there were any errors raised during this process, the printManager prints the error withPrintManager#printError.

4.6.2. Design Considerations
Aspect: Single parameter vs Multiple parameters Update
- Alternative 1: Separate commands to update each parameter for a
Goalobject.- Pros: Separate classes are written for each command, which streamlines the process for adding more parameters in the future.
- Cons: The user will be swamped by more command keywords.
- Alternative 2 (current choice): A single command that can update multiple parameters for a
Goalobject.- Pros: The user has to remember only one command keyword to update the parameters of a goal.
- Cons: Multiple checks have to be carried out within a class, which may be confusing due to long lines of code.
4.7. Updating a Habit
This section describes the implementation of how the user can update a habit’s name and/or interval length.
4.7.1. Implementation
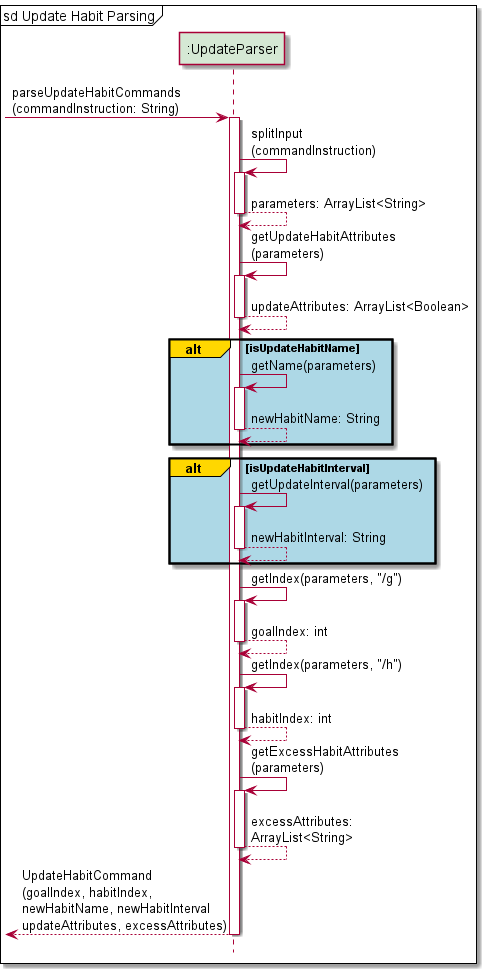
- The
UpdateParser#parseUpdateHabitCommands(commandInstruction)method is called, which starts the process of extracting parameters from the user input. - The
UpdateParser#splitInput(commandInstruction)method splits the user input into an ArrayList of parameters. - The
UpdateParser#getUpdateHabitAttributes(parameters)method is used to confirm what attributes exist in the user input and finds the flags for those attributes (habit name, habit interval). - If
isUpdateHabitNameis true,UpdateParser#getName(parameters)is called to get the updated name. - Similarly, if
isUpdateHabitIntervalis true,UpdateParser#getUpdateInterval(parameters)is called to get the updated interval. - The
goalIndexandhabitIndexto update is then obtained with theUpdateParser#getIndex(parameters, FLAG_GOAL_INDEX)andUpdateParser#getIndex(parameters, FLAG_HABIT_INDEX)methods respectively. - Any excess attributes provided in the input is found with the
UpdateParser#getExcessHabitAttributes(parameters)method. This is required as a parameter for theUpdateHabitCommandconstructor. Its use is detailed in the steps below. - Finally, a
UpdateHabitCommand(goalIndex, habitIndex, newHabitName, newHabitInterval, updateAttributes,
excessAttributes)
object is created and returned from theUpdateParser#parseUpdateHabitCommands(commandInstruction)method.
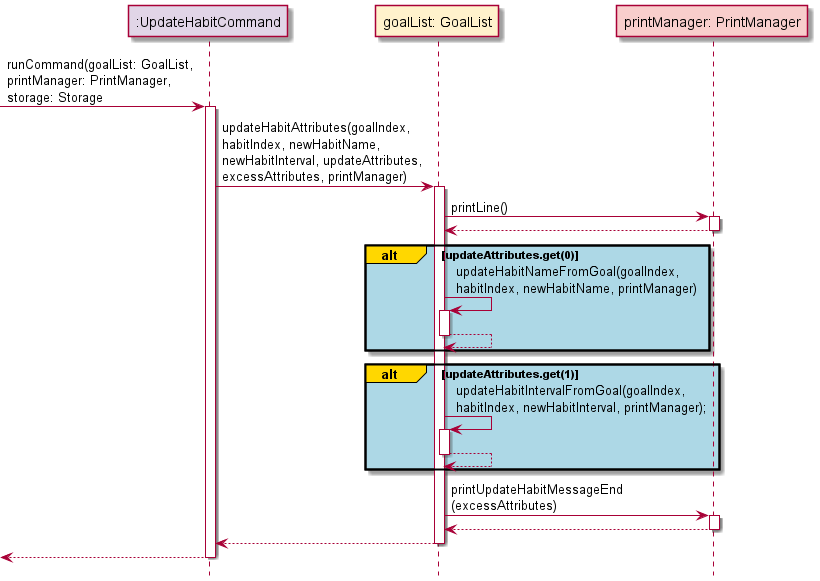
- The
UpdateHabitCommand#runCommand(goalList, printManager, storage)method is called, which in turns calls theGoalList#updateHabitAttributes(goalIndex, habitIndex, newHabitName, newHabitInterval, updateAttributes, excessAttributes, printManager)method. - Within this newly called method, the
PrintManager#printLine()method is called to print a line to separate the new messages being printed. - Based on the
updateAttributesparameter, if the first element is true,GoalList#updateHabitNameFromGoal(goalIndex, habitIndex, newHabitName, printManager)is called to update the habit name, calling thePrintManager#printUpdatedHabitName(goalDescription, oldHabitDescription, newHabitDescription)method to print a confirmation message on successful update of goal name. This is done after performing some checks on whether the new habit name is valid. Exceptions are raised if the new habit name is not valid.
Similarly, if the second element ofupdateAttributesis true,GoalList#updateHabitIntervalFromGoal(goalIndex, habitIndex, newHabitInterval, printManager)is called to update the interval of the specified habit, calling thePrintManager#printUpdatedHabitInterval(goalDescription, habitDescription, newInterval)method to print a confirmation message on successful update of habit interval. This is done after performing some checks on whether the new habit interval is valid. Exceptions are raised if it is found to be invalid. - Lastly, the
PrintManager#printUpdateHabitMessageEnd(excessAttributes)method is called to print a message if some excess parameters can be modified with a different command. - Finally, since this command modifies the
goalListdata, the modified data is saved to the program data file withStorage#export(goalList). If there were any errors raised during this process, the printManager prints the error withPrintManager#printError.
4.7.2. Design Considerations
Aspect: Update of habit interval lengths
- Alternative 1 (current choice): Allow the length of an interval for a habit to be updated.
- Pros: The user may find that an interval is too short or long, and switch up their routine accordingly to suit their needs.
- Cons: Since all intervals are generated upon habit creation, logic has to be implemented to remove all existing future intervals, and new intervals have to be regenerated based off this new interval length.
- Alternative 2: Prevent a user from changing the interval length after a habit has been created.
- Pros: The user is prevented from abusing the change of interval length to inflate their completion rate.
- Cons: If the habit routine initially created by the user does not suit him/her, the entire habit has to be recreated, meaning that all past data will be lost.
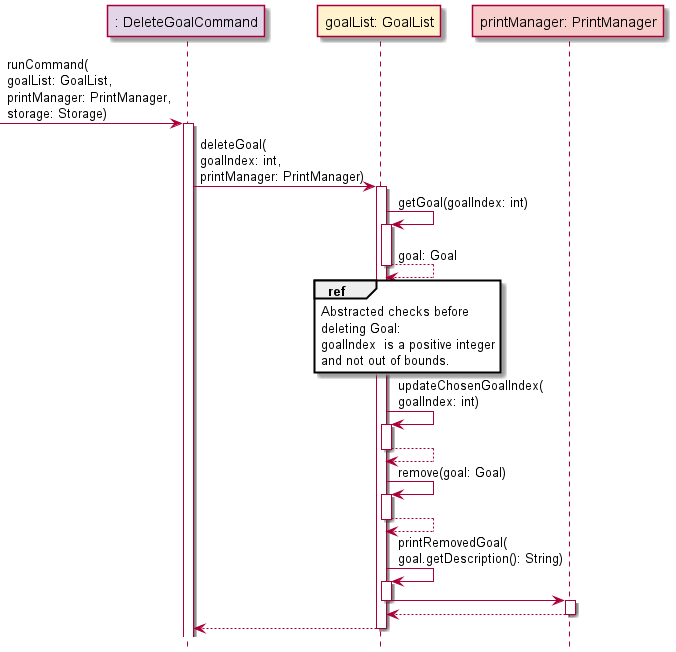
4.8. Deleting a Goal
This section describes the implementation of how the user can delete a goal from their list of tracked goals.
4.8.1. Implementation
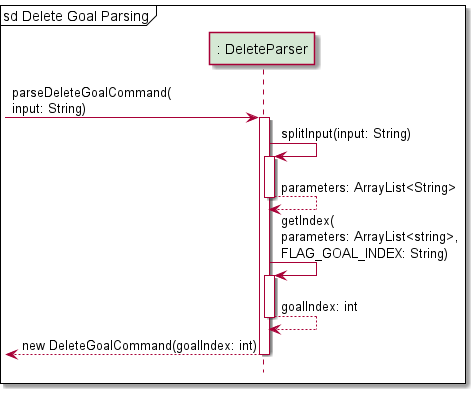
- The
DeleteParser#parseDeleteGoalCommand(input)method is called, which starts the process of extracting parameters from the user input. - The
DeleteParser#splitInput(input)method splits the user input into an ArrayList of parameters. - The
goalIndexto delete is then obtained withDeleteParser#getIndex(parameters, FLAG_GOAL_INDEX)method. - A
DeleteGoalCommand(goalIndex)object is created and returned from theDeleteParser#parseDeleteGoalCommand(input)method.
 )
)
- The
DeleteGoalCommand#runCommand(goalList, printManager, storage)method is called, which in turns calls theGoalList#deleteGoal(goalIndex, printManager)method. - Within this newly called method, the
GoalList#getGoal(goalIndex)method is called to retrieve theGoalobject from thegoalList. - The
GoalList#updateChosenGoalIndex(goalIndex)method is called to perform checks on the goal to be deleted. - The
Goalis then deleted with theGoalList#remove(Goal)method. - Finally, the
PrintManager#printRemovedGoal(goalDescription)method is called to print a confirmation message on the successful deletion of a goal.
4.8.2. Design Considerations
Aspect: Goal index of remaining goals
- Alternative 1: Maintain the goal index of all other goals after deletion.
- Pros: Users that has committed the goal index of their tracked goals to memory do not need to worry about changes to their goals’ indexes after a deletion is made.
- Cons: Additional logic to be implemented to fill up gaps by deleted goals with new goals.
- Alternative 2 (current choice): Goal indexes are flushed whenever a deletion is made. This means that a goal with
an original index of ‘3’ will have its index change to ‘2’ if the goal at index
‘1’ is deleted.
- Pros: Logic for the goal list is easier to implement (simply use the add() and remove() methods of ArrayList).
- Cons: Users need to constantly check their list of tracked goals to ensure that the correct goal is being updated.
4.9. Deleting a Habit
This section describes the implementation of how the user can delete a habit from an associated goal from their list of tracked goals.
4.9.1 Implementation
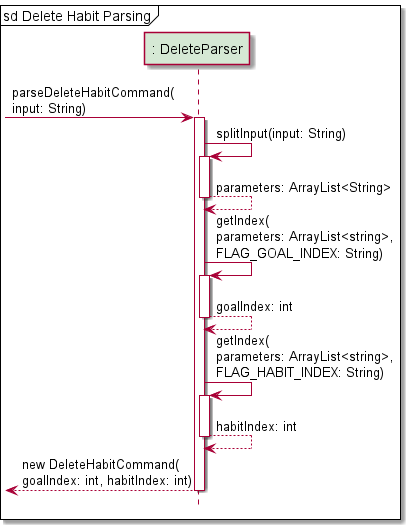
- The
DeleteParser#parseDeleteHabitCommand(input)method is called, which starts the process of extracting parameters from the user input. - The
DeleteParser#splitInput(input)method splits the user input into an ArrayList of parameters. - The
goalIndexof the associated goal from which a habit to deleted is then obtained withDeleteParser#getIndex(parameters, FLAG_GOAL_INDEX)method - The
habitIndexof the habit to deleted is then obtained withDeleteParser#getIndex(parameters, FLAG_HABIT_INDEX)method - A
DeleteHabitCommand(goalIndex, habitIndex)object is created and returned from theDeleteParser#parseDeleteHabitCommand(input)method.
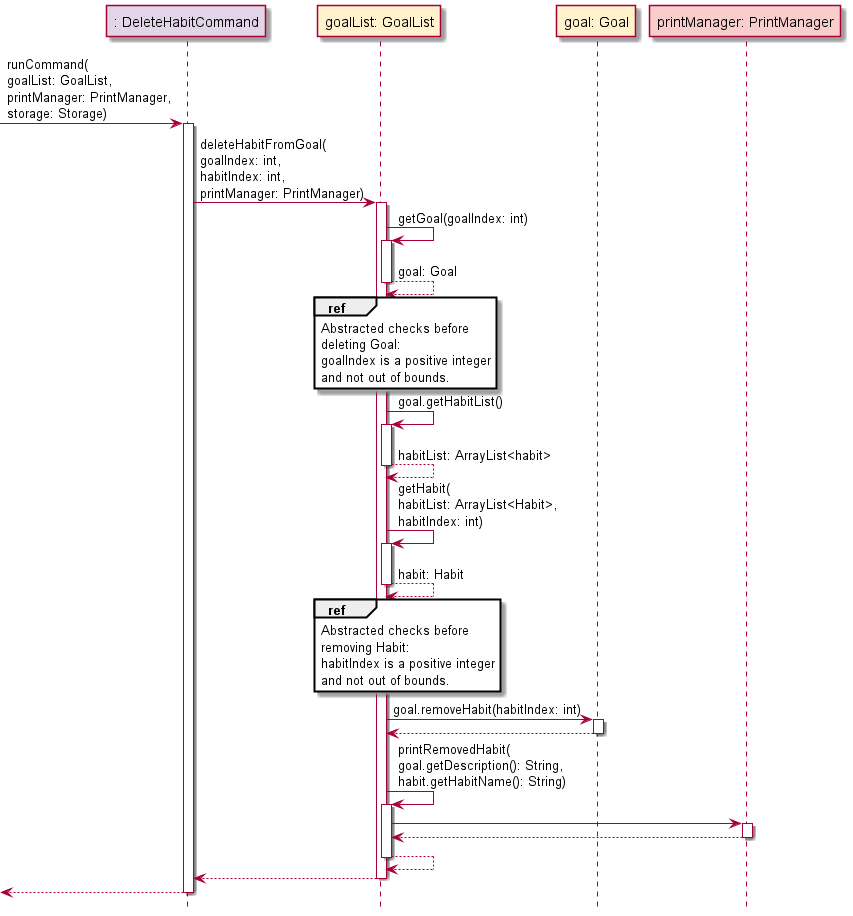
- The
DeleteHabitCommand#runCommand(goalList, printManager, storage)method is called, which in turns calls theGoalList#deleteHabitFromGoal(goalIndex, habitIndex, printManager)method. - Within this newly called method, the
GoalList#getGoal(goalIndex)method is called to retrieve theGoalobject from thegoalList. - An ArrayList of habits associated with this goal is retrieved with
Goal#getHabitList(). - The
GoalList#getHabit(habitList, habitIndex)method is called to get the habit to be deleted. IfhabitIndexis invalid, aHaBitCommandExceptionis raised. - The
Habitis then deleted with theGoal#removeHabit(habitIndex)method. - Finally, the
PrintManager#printRemovedHabit(goalDescription, habitDescription)method is called to print a confirmation message on the successful deletion of a habit.
4.9.2. Design Considerations
The design consideration was similar to Section 4.8.2. Design Considerations, where it was ultimately decided that the habit indexes will be flushed to avoid gaps instead of being maintained.
4.10. Getting Help
This section describes the implementation of how the user can get help. This will open up a command summary with format information of each command in a tabular form.
4.10.1 Implementation
- A
HelpCommand()object is directly created and returned from theParserManager#parseCommand(command, details)method. - When the
HelpCommand#runCommand(goalList, printManger, storage)method is executed it calls thePrintManager#printCommandList()method which prints out a table informing the user of all the possible commands and their respective formats and options.
4.10.2. Design Considerations
Aspect: Type of display for command list
- Alternative 1 (current choice): In-application display of entire command list.
- Pros: The application does not have to be connected to a network if a user needs help with the navigation.
- Cons: Limited information can be presented on the application itself. Furthermore, a long command list may result in a significant amount of scrolling for the user.
- Alternative 2: Opens a browser to the command summary of the User Guide.
- Pros: Every detail (including possible pitfalls) of the command is made known to the user.
- Cons: Network connection is required for an application that should be able to operate without sustaining one. In addition, a link to the User Guide will be provided in the Start-Up interface.
4.11. Storage of Information
This section describes the implementation of how Ha(ppy)Bit handles and stores the information you have entered.
4.11.1. Implementation
Importing Data
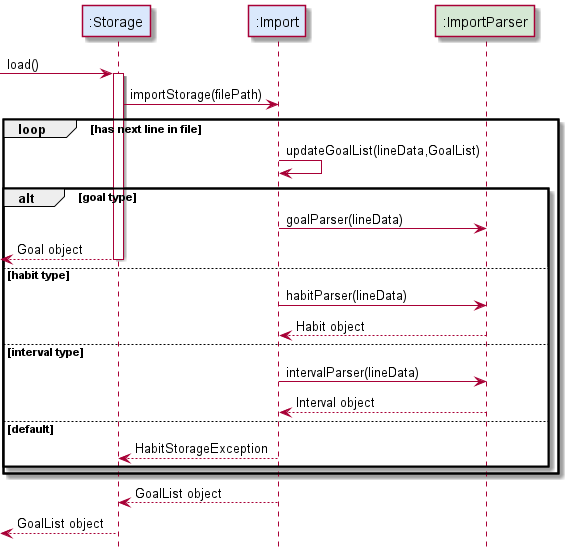
- The
Storage#load()method runs automatically upon startup, which callsImport#importStorage(filePath). - The save file
habits.txtis then scanned line by line, where every line is parsed into discrete and discernible information and then stored in a string arraylineData. Import#updateGoalList(lineData, GoalList)is called for every line till all lines have be scanned.- In every iteration of
Import#updateGoalList(lineData, goalList)being called, the information (sorted by goal type) is parsed and stored intogoalList, updatinggoalList. - The completed
goalListis returned toStorage, and then returned to update the maingoalListattribute inUiManager.
The sequence diagram shows how the program imports data from storage file.
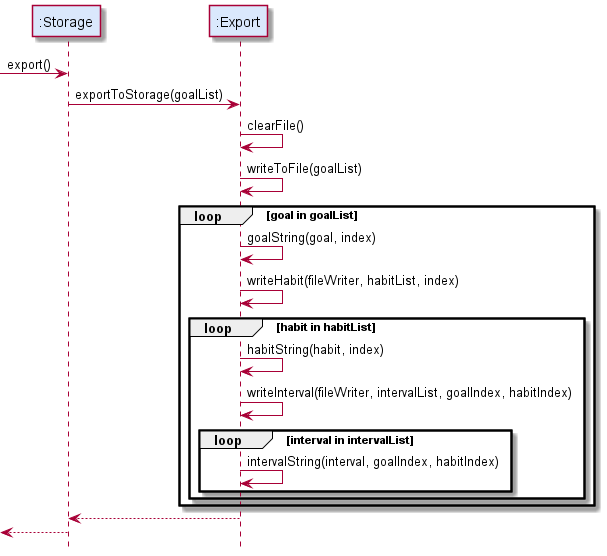
Exporting Data
- The
Storage#export(goalList)method is called, which in turn callsStorage#exportToStorage(goalList). - The
habits.txtfiled is cleared of previous text withExport#clearFile(). - The
Export#writeToFile(goalList)then rewriteshabits.txtusing data ingoalList. - The
goalListis encoded goal by goal. - In a
goalobject, all of its attributes are converted to text in a line. They are segregated by a delimiter. The habits are then are encoded habit by habit. - In a
habitall of its attributes are converted to text in a line. They are segregated by a delimiter. The intervals are then encoded interval by interval. - In an
intervalall of its attributes are converted to text in a line. They are segregated by a delimiter. - At the end of
Export#writeToFile(goalList), all data ingoalListis stored inhabits.txt.
The sequence diagram shows how the program exports data to storage file./
4.11.2. Design Considerations
Aspect: Storage of application data
- Alternative 1 (current choice): Store all data in a text file.
- Pros: The standard Java library already supports reading and writing to text files.
- Cons: Interpreting data directly from text files is non-trivial (depending on how the data is saved)
- Alternative 2: Store all data in a JSON format.
- Pros: JSON is a widely accepted standard which is well known, allowing anyone to view and modify the save file when necessary.
- Cons: Various data types are not supported in JSON formatted files.
Appendix A: Product Scope
Target user profile:
- wants to have a work-life balance but is often consumed by work/school
- have goals and aspirations but falls short of them; lacklustre commitment or game plan for action
- doesn’t want to rely on smartphone (They’re doing everything these days, sheesh!)
- prefers desktop app
- familiar and comfortable with CLI apps, or willing to learn to use
Value proposition
Users with Ha(ppy)Bit will find themselves cultivating good habits and breaking bad habits despite hectic workload or commitments.
Appendix B: User Stories
| Version | As a … | I want to … | So that I can … |
|---|---|---|---|
| v1.0 | new user | see usage instructions | refer to them when I forget how to use the application |
| v1.0 | user | set a new goal I wish to accomplish | start working towards completing the goal |
| v1.0 | user | add habits i wish to carry out in the process of accomplishing my goal | break down the journey of achieving my goal into smaller manageable steps |
| v1.0 | user | remove a goal from my list of goals | remove goals that I no longer wish to work towards |
| v1.0 | user | delete a habit added under a goal | remove a habit that I no longer wish to carry out |
| v1.0 | user | mark a habit as done | indicate that I have completed that habit |
| v1.0 | user | list out all the goals I have | remind myself of the goals I am working towards |
| v1.0 | user | view all the habits I have set for each goal | check which habits I have yet to complete |
| v1.0 | user | have import and export functionality in the program | access goals and habits previously set from a local data storage |
| v2.0 | user | have recurring habits at a regular interval | habitually carry out the habits I set for myself |
| v2.0 | user | be able to view my progress for any goal | motivate myself in the process |
| v2.0 | user | view all my habits due for the day upon entering the program | remember to carry out these habits by the end of the day |
Appendix C: Non-Functional Requirements
| Non-Functional Requirements | Requirement Type |
|---|---|
App should be operable on Windows, macOS, and Ubuntu running Java 11 or above. |
Technical |
| App can be learned anyone who is familiar with computer within minutes of use. | Quality |
| App should be a helpful, encouraging, and a joy to use. | Quality |
Appendix D: Glossary
- Goal: A long term achievement you wish to accomplish
- Habit: Checkpoints; actionable tasks to be done to achieve goal
Appendix E: Instructions for Manual Testing
The instructions below are for the manual testing of the program.
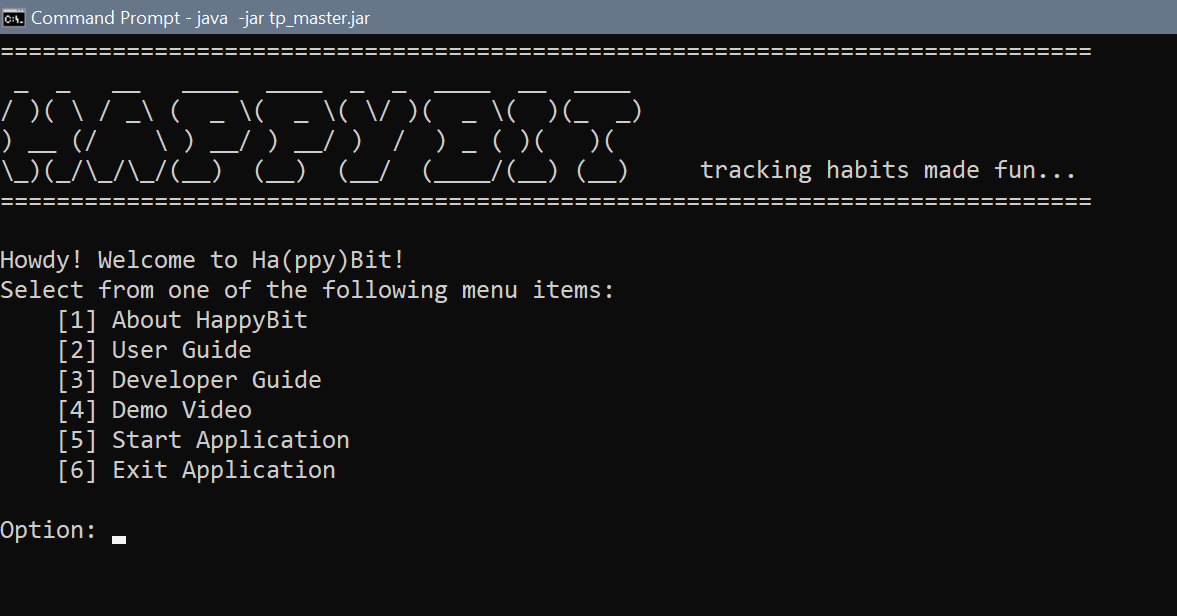
Launching and Exiting the Program
Launch
- Download the jar file here and copy the file into an empty folder.
- Open your terminal and type in the command
java -jar happybit.jarto start up the program. - You should see the start-up page with the start-up menu as shown below.
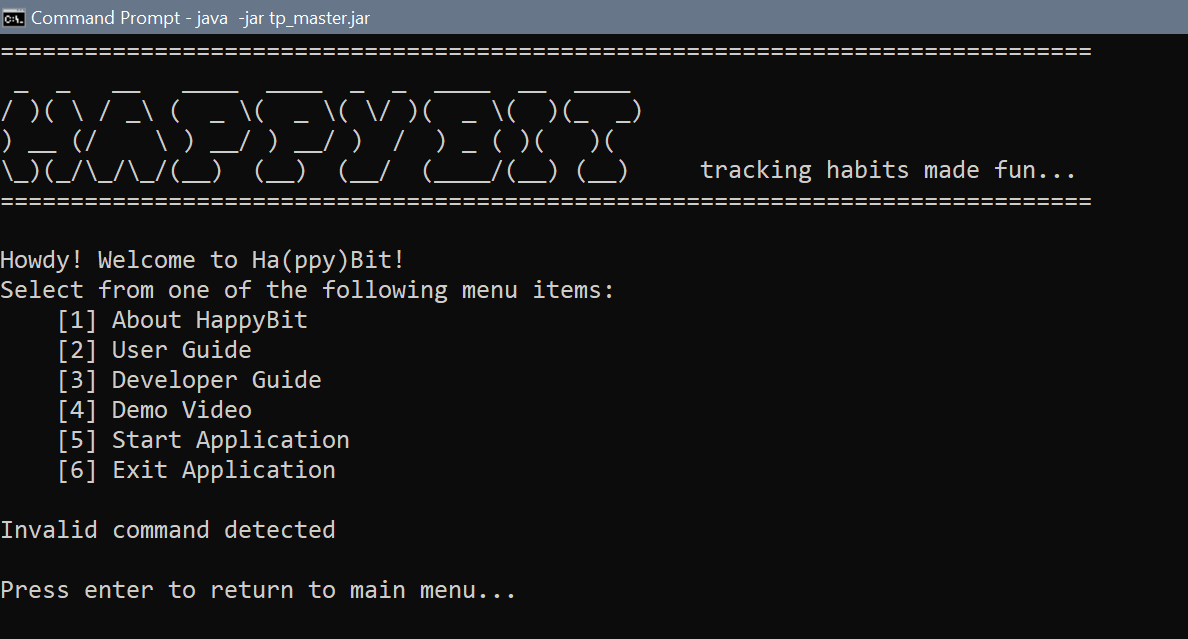
Navigation
- Select what you are interested in from the start-up menu by typing in the corresponding option number.
- You can find out more about the various options at our User Guide.
- There will be an error message shown if you select an invalid option.
- Test:
-1to see the error message.
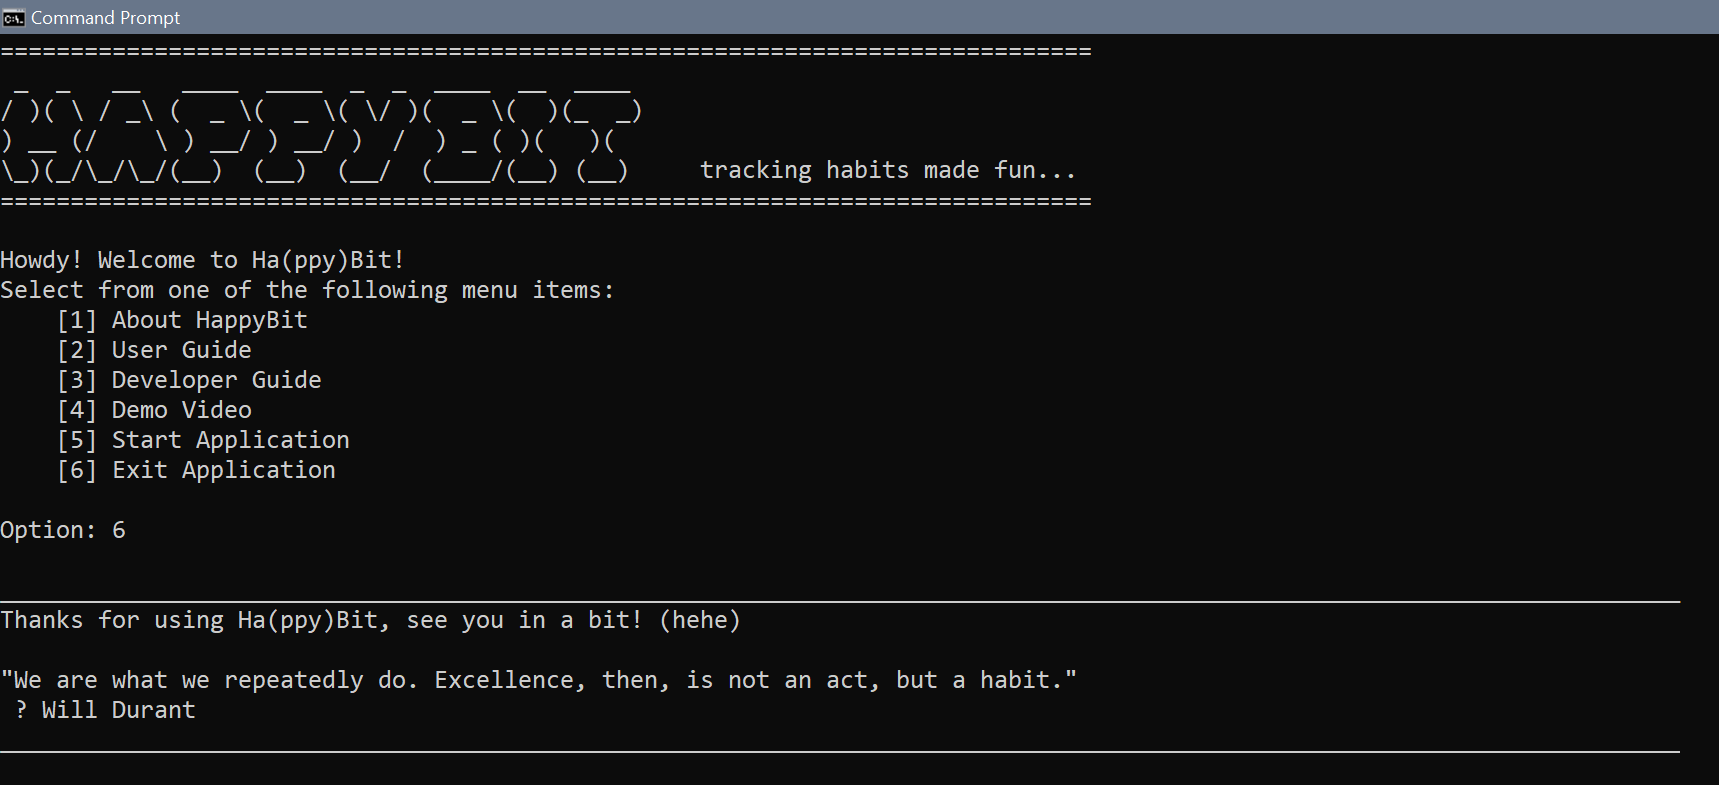
Exit
- To exit the program, select option
6. - You should see the exit message before the program terminates as shown below.
Starting the Application
- Launch the program and select option
5to start using the application. - Upon starting the application, you should see the command screen as shown below.
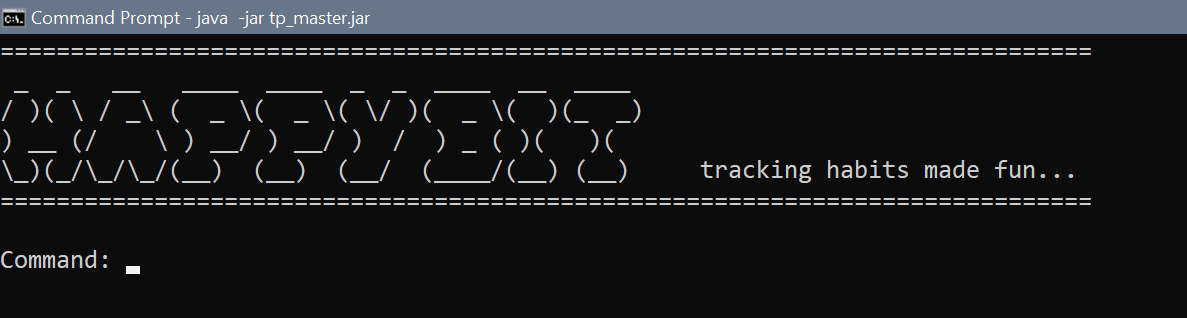
- Command screen takes in your input at
Command:. Press ‘enter’ after typing in your command. - For example, to set a goal:
set n/Wake up at 8am everyday t/sl s/08112021 e/15112021- The name of goal:
Wake up at 8am everyday - The goal is classified as a sleeping goal:
sl - Start the goal at:
08112021(08 Nov 2021) - End the goal at:
15112021(15 Nov 2021)
- The name of goal:
- After you have entered the command to add a goal, you should see that the goal was successfully added.
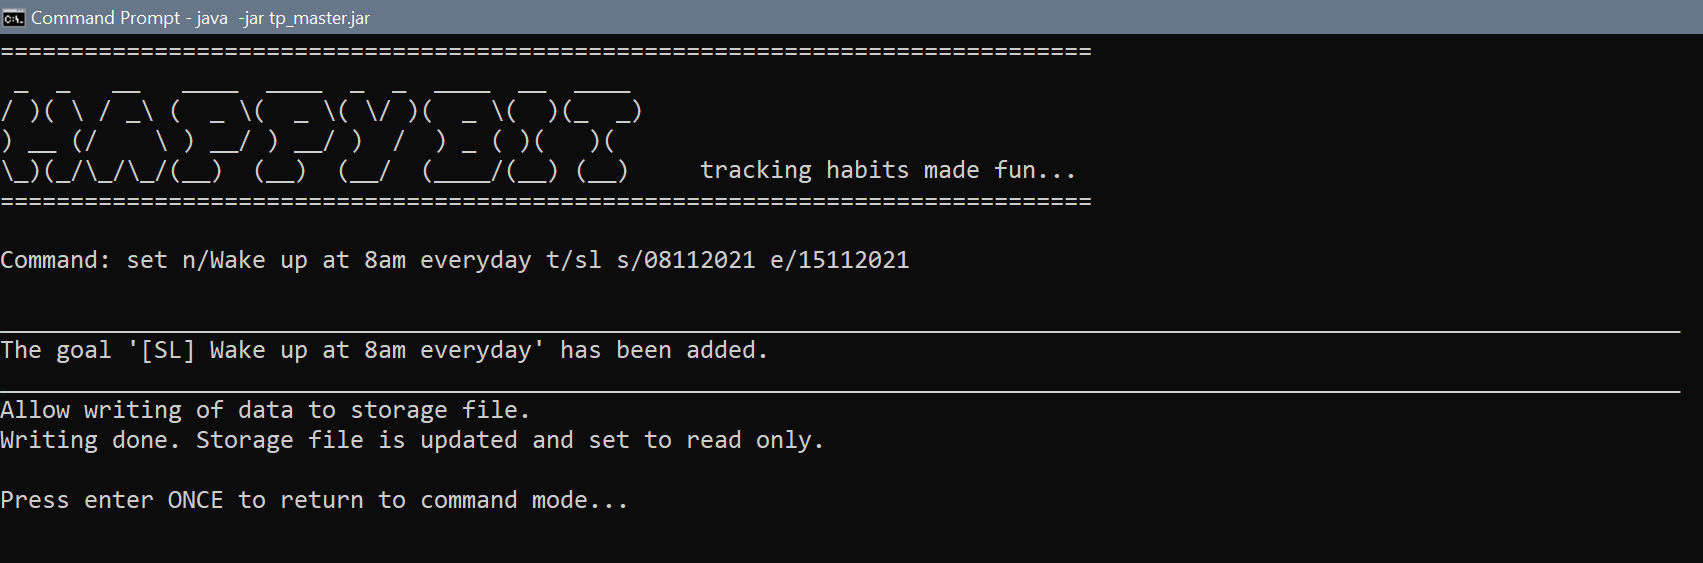
- Press enter again to return to command screen.
Deleting Goals or Habits
After adding in a substantial number of goals and habits, you can test out the deletion commands as shown below.
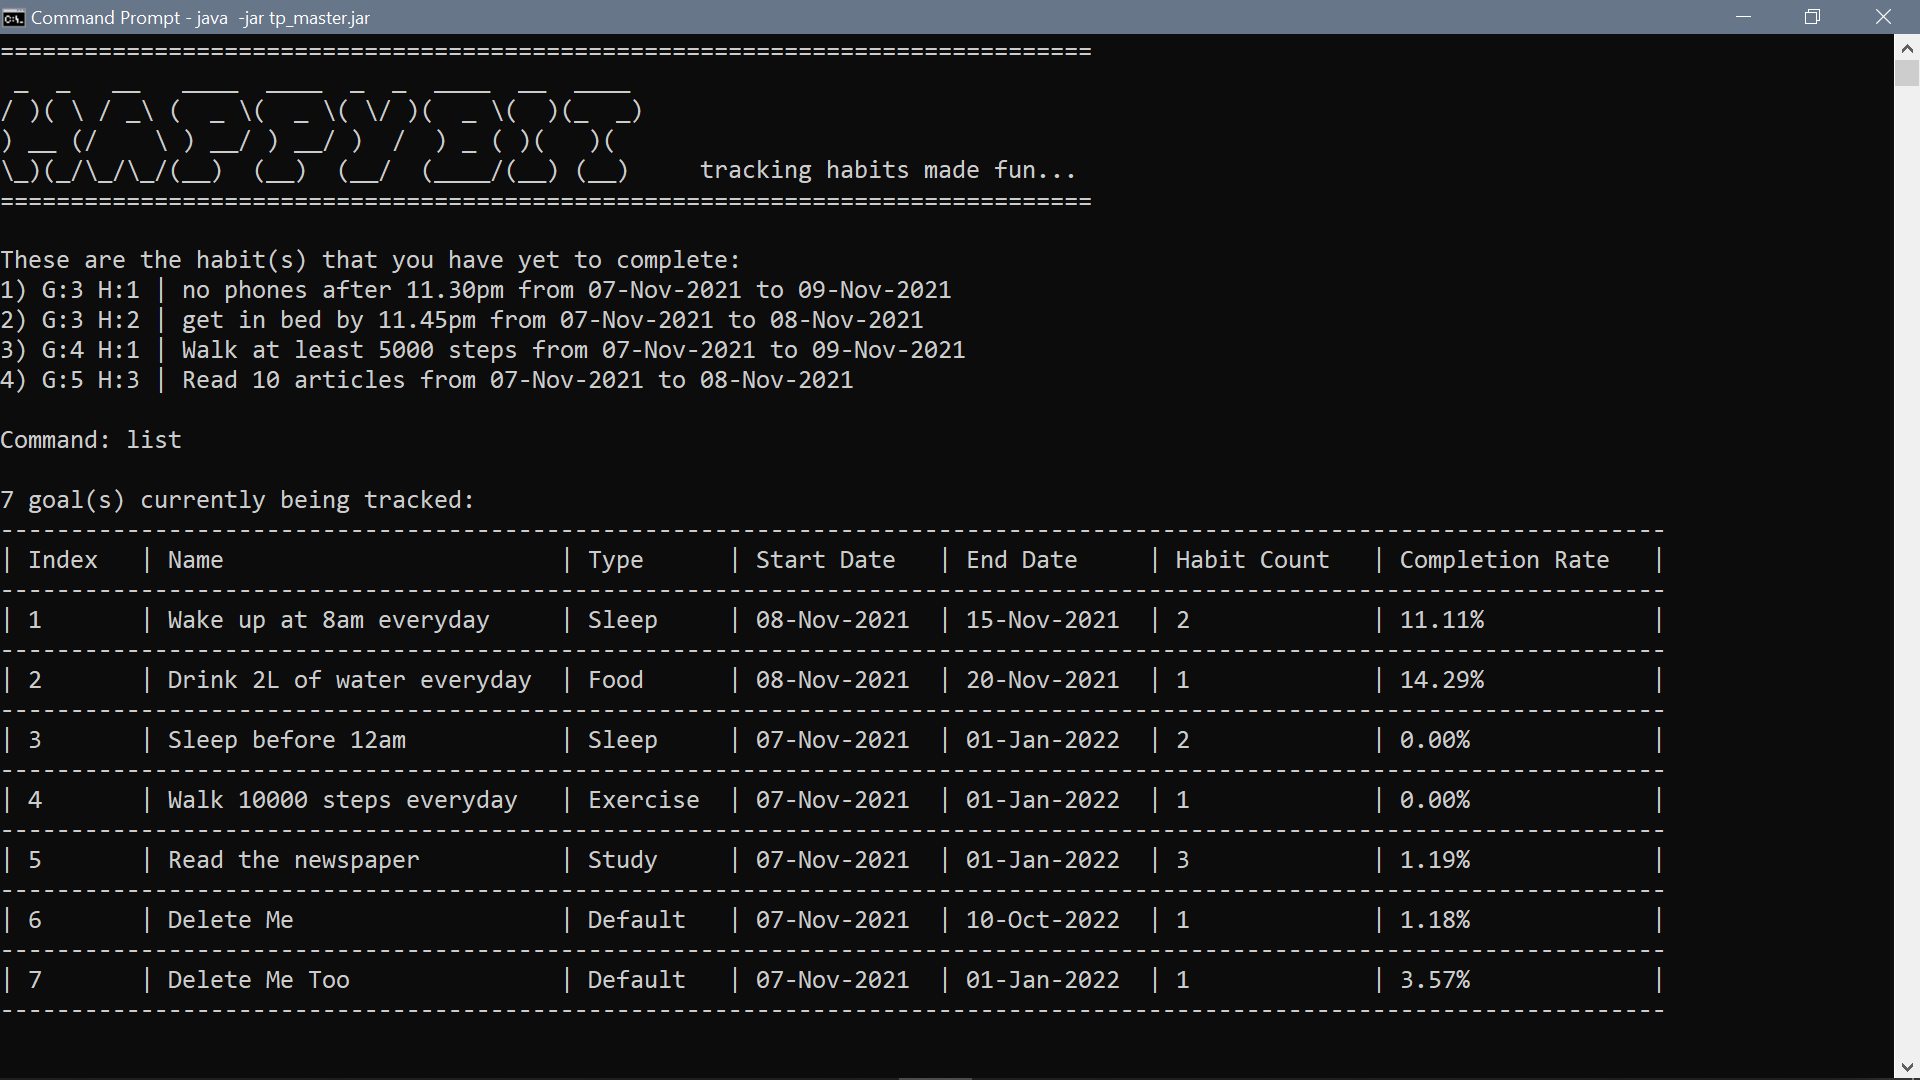
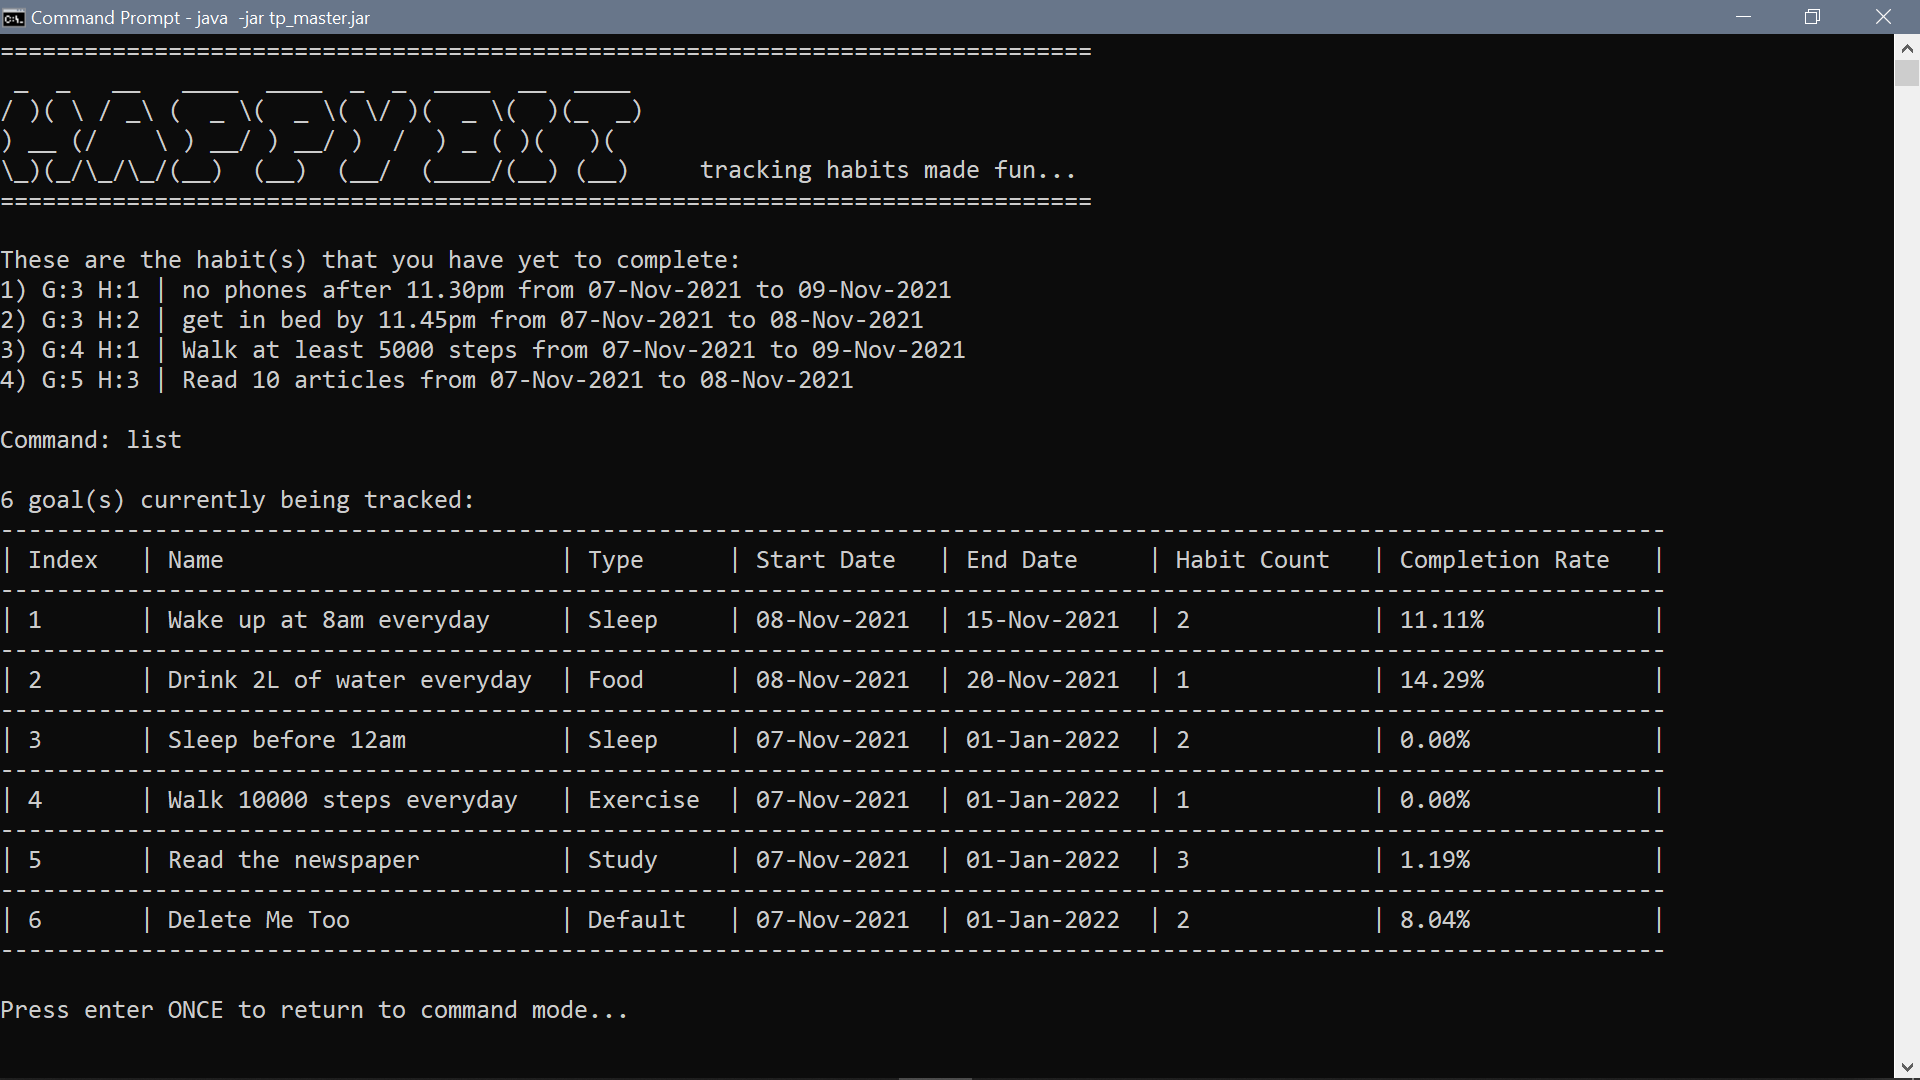
To see all the goals you have added, use command list. You should take note of the index of the goal that you
want to delete. We will be using the list shown below as an example.
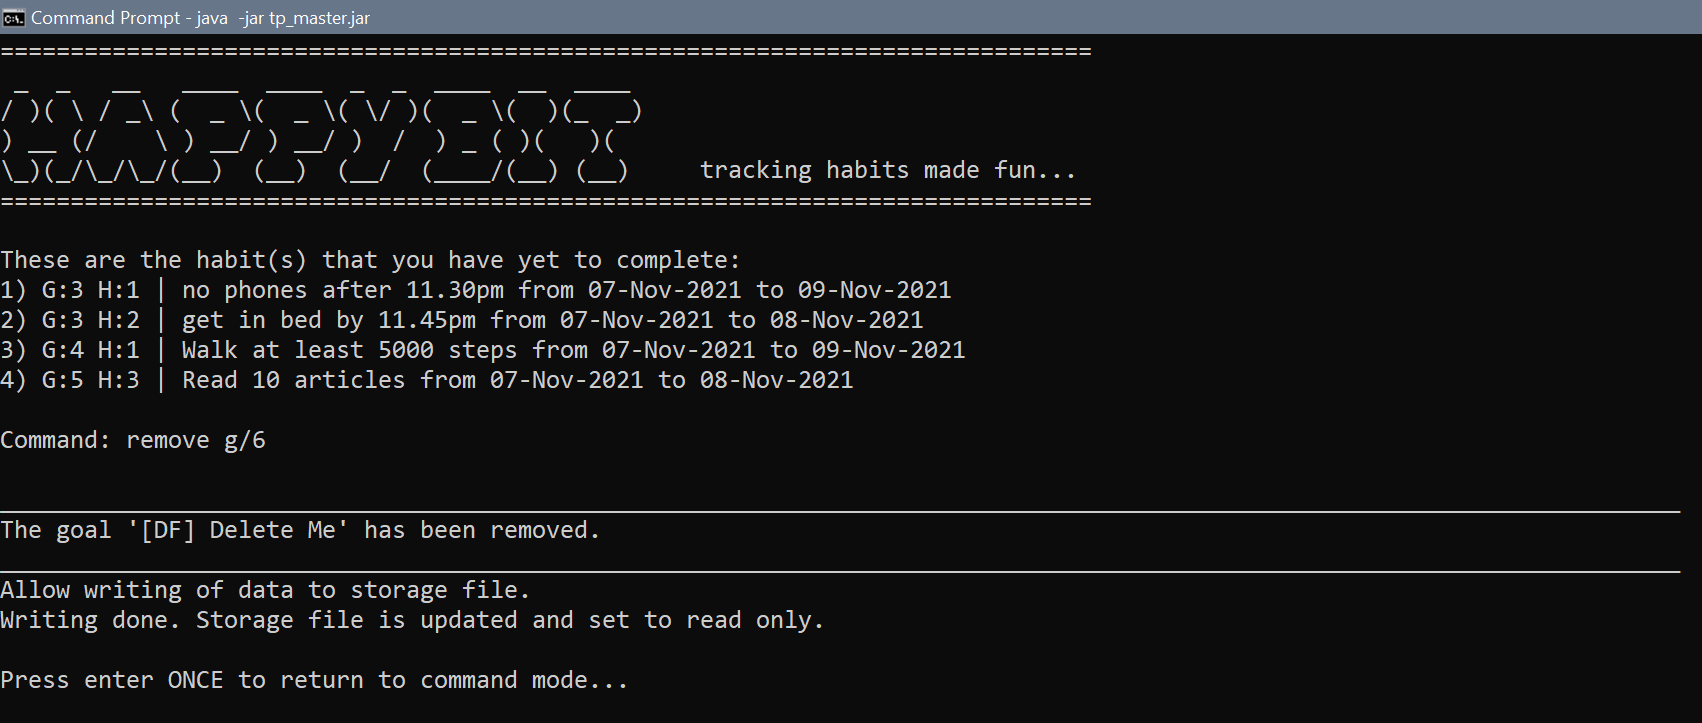
To delete a goal, use the command remove.
- Test:
remove g/6to remove goal at index6.
Use the command list to see the new index of the goals.
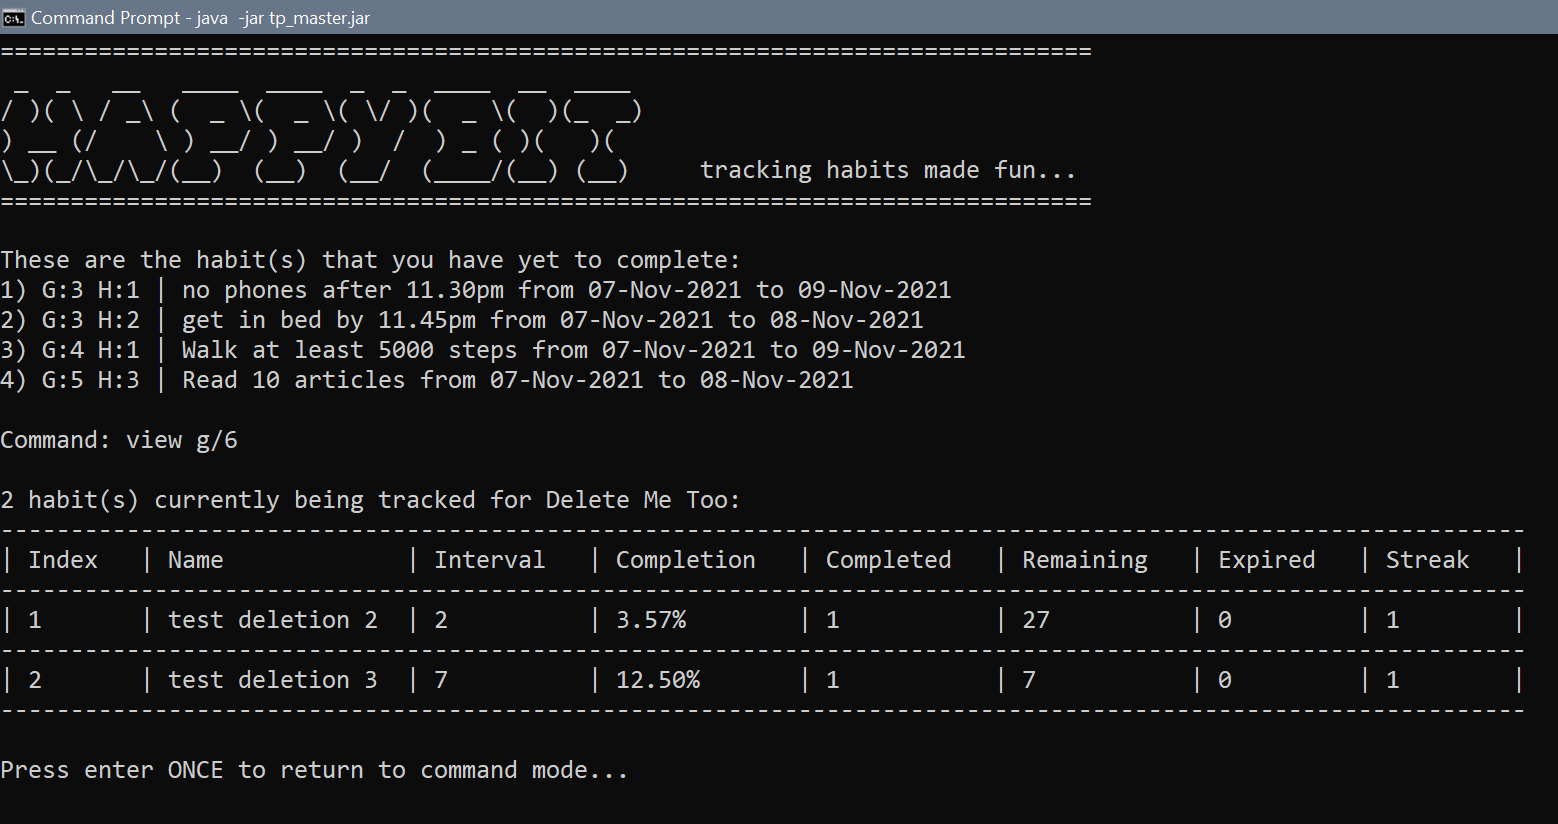
Next, use view to see the index of the habit under a goal that you want to delete.
- Test:
view g/6to view the habits under goal6.
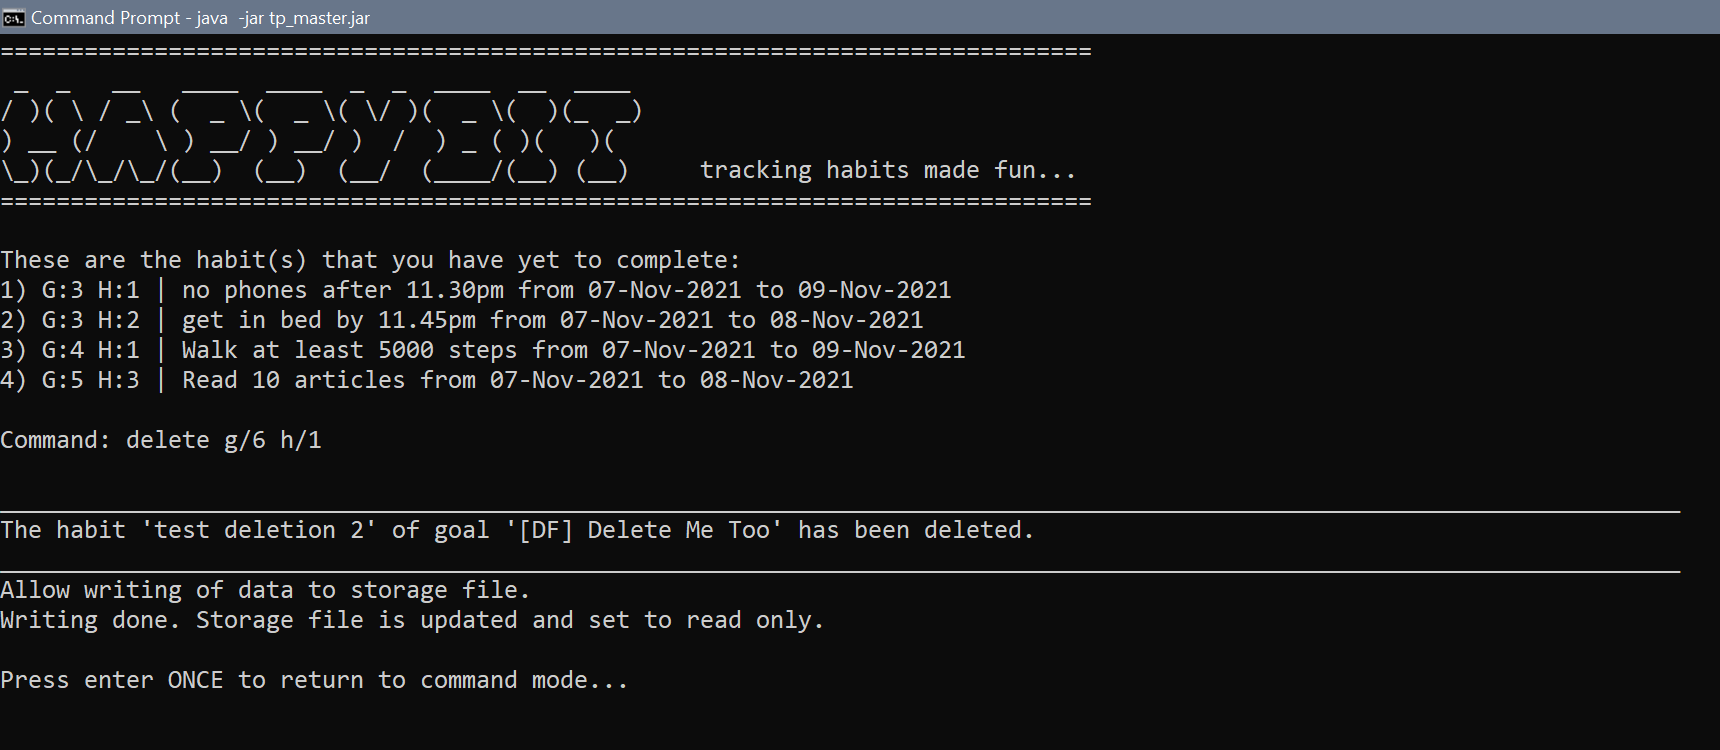
To delete a habit, use the command delete.
- Test:
delete g/6 h/1to delete habit1under goal6.
After any deletion, the index of the goals or habits will change. Therefore, make sure to use commands
list and/or view to check for the new index of the goals and habits.
- Test:
remove g/7to remove a goal at index7that does not exist. Error will be thrown.

Storage of Data
To check if the program can save and load your data:
- Exit the application using command
exit. - Launch the program and enter the application again.
- Type
listto check that all your previous data are present. - If your data are all present, it means that the program successfully saved and loaded your data from the storage file.
⚠ The subsequent steps might cause you to lose your data.
To check if the program can create a storage file if it doesn’t exist:
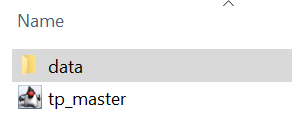
- Go to the folder containing the jar file. You should see a folder
datathat contains a.txtfile which contains your data. Delete the folderdataor move it somewhere else.
- Launch the program and enter the application.
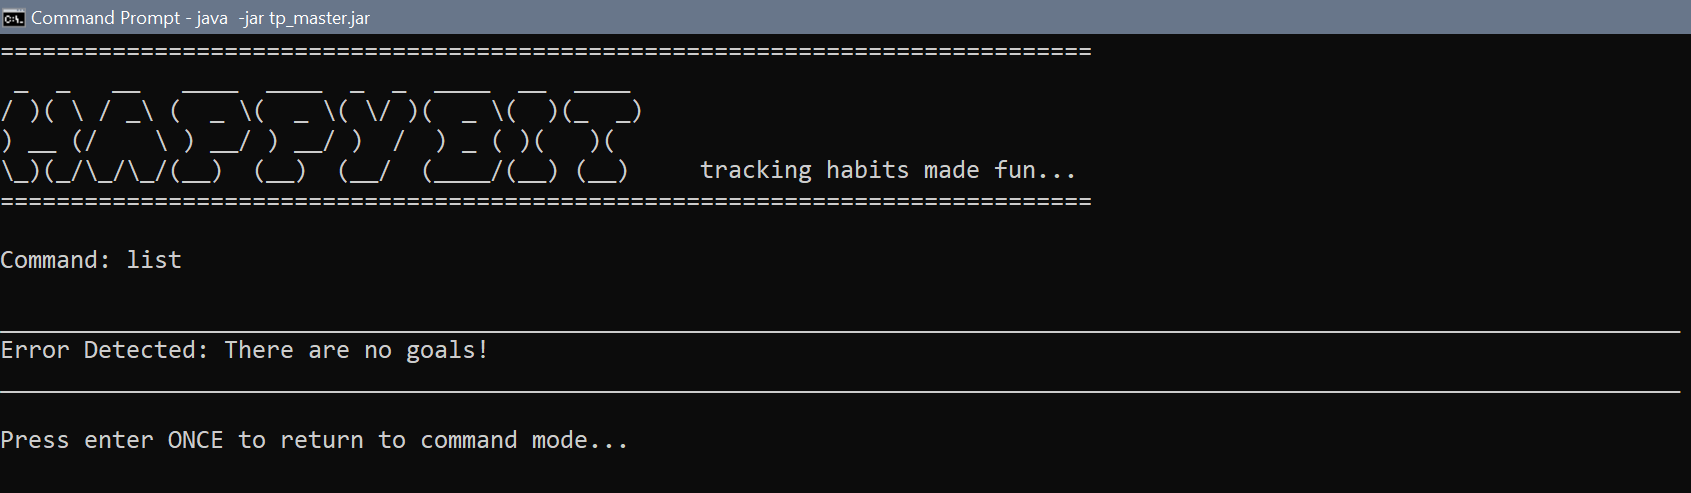
- Type
listto see that no goals exists since the storage file was deleted. A new empty storage file will be created by the program.
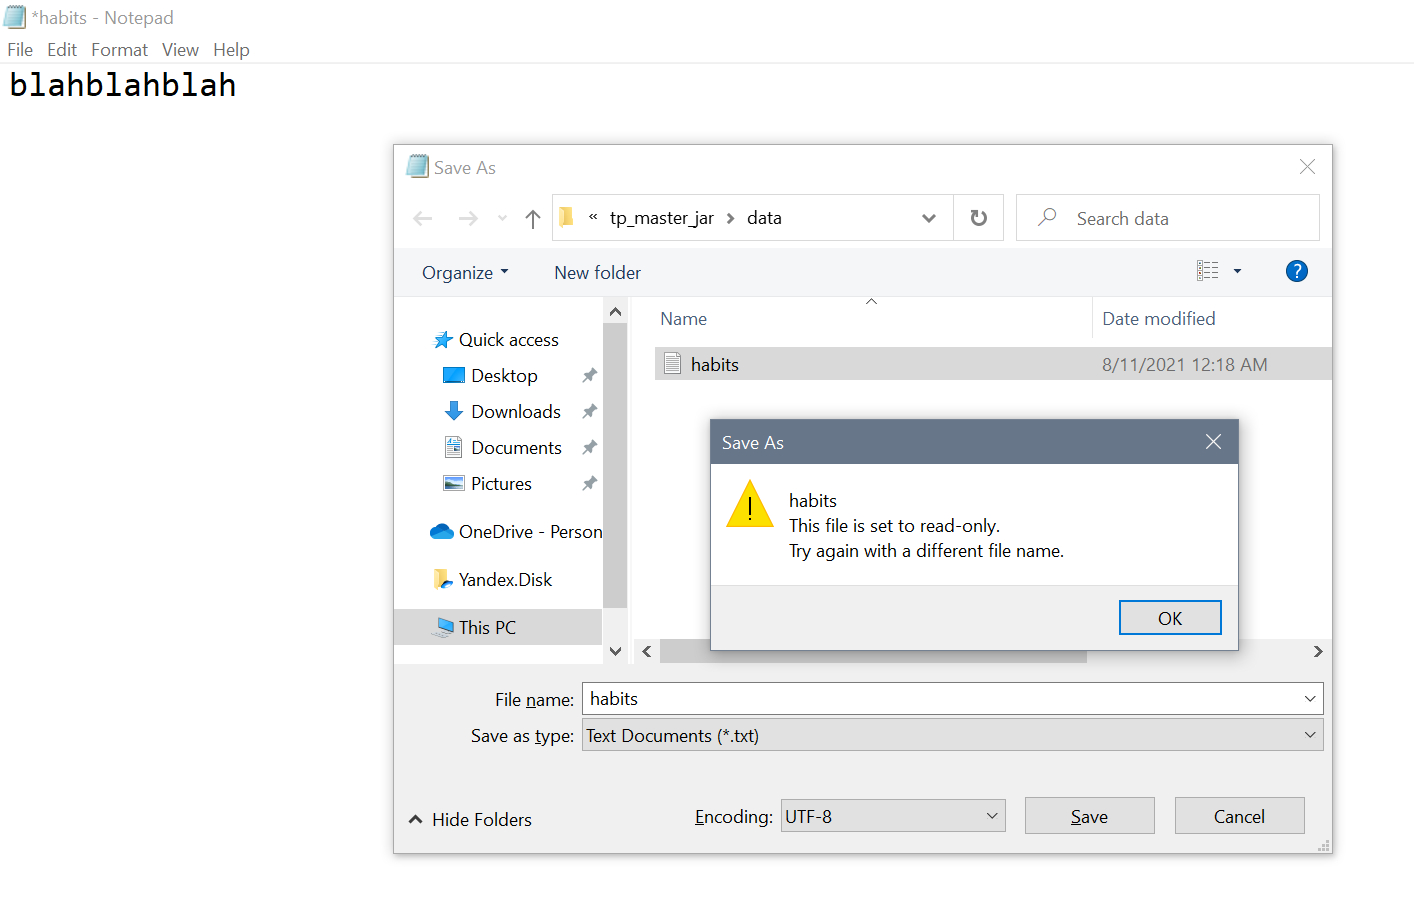
To check if the data file is read-only and if it is possible to corrupt data file:
- The storage file is set to read-only. To test this, go to
datafolder and open the.txtfile. - Randomly edit the text file to corrupt it.
- Try to save the changes and there should be an error message preventing you to do so.
To check that in the event the data file is corrupted, all the data will be wiped off:
- If the data file is for some reason corrupted, note that you will lose all your data.
- Once you enter the application, and it detects that the file is corrupted, it will clear the file.
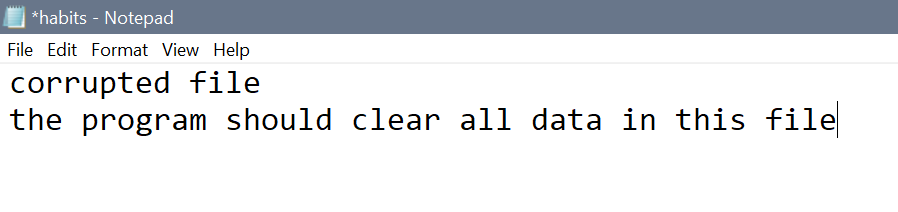
- Without adding any data in the application, exit the program and check back to the corrupted file. It should be empty.